 Docs
Docs
Web Hosting
Kinvey Web Hosting allows you to host websites and web applications that are working through static files. This includes:
- Single Page Applications (SPAs)
- Progressive Web Applications (PWAs)
- Static HTML websites
The following features are supported in Kinvey Web Hosting:
- Content Delivery Network (CDN)
- TLS encryption
- Publishing under kinveyweb.com
- Continuous Integration/Continuous Integration (CI/CD) enablement through Kinvey CLI
Restrictions
Kinvey Web Hosting poses the following default restrictions:
- Maximum number of websites per organization: 10
- Maximum size of a website: 200 MB
- Maximum size of a single file: 50 MB
Contact Kinvey Support if you need some of the above limits adjusted.
Creating a Website
Before you can upload files, you need to create a website. In Kinvey terms, creating a website means selecting an internal name for the website and giving it a description. Nothing will appear online until you upload your first files.
Most of the time, you would create a website using Kinvey Console but if you want to include this task in CI/CD, you can also utilize Kinvey CLI.
To create a website using Kinvey Console:
- On the Kinvey Console main screen, select the Websites tab.
- Click Add Website.
- Give the website a Name and an optional Description.
- Specify the website's scope: App or Organization.
- Click Add Website.
To create a website using Kinvey CLI:
- Ensure that you are logged in.
Execute the
websites createcommand to create a website.For example:
kinvey website create MyWebsite --app MyApp
See the Kinvey CLI documentation for the full list of options.
Deploying a Website
After you create a website, you need to deploy files to it. The principal tool for deploying websites is Kinvey CLI.
Note that you can only deploy a website as a whole. You cannot deploy single files.
Deploying a Website Using the Kinvey CLI
You can deploy a folder or a single-file website using the website deploy Kinvey CLI command. Before you deploy, ensure that the index file of your website matches the index file name specified when creating the website.
To deploy a website:
- Ensure that you are logged in.
Execute the
website deploycommand.For example, to deploy a folder:
kinvey website deploy --website MyWebsite --path /websites/MyWebsite/
See the Kinvey CLI documentation for the full list of options.
Previewing a Website
After you have deployed files to a website, you can preview them on a preview URL. The preview functionality is designed for development purposes. It is not wired through CDN and is not affected by CDN cache. It always shows the latest files that you deployed.
The preview URL is generated automatically. It is public but not TLS protected. It may expire after some time, even if you haven't made changes to the website. You should not store it with the intention to reuse it and you should not give it to customers.
To preview a website:
- On the Kinvey Console main screen, select the Websites tab.
- Open the website that you want to preview.
On the Overview tab, click Preview.
The website opens in your default web browser.
When deploying using Kinvey CLI, the preview URL also appears in the command output on success.
Publishing a Website
To get a URL that you can share publicly, you need to explicitly request it by making your website public. This essentially creates a URL that:
- is wired through CDN
- is TLS protected
- will not change unless you explicitly change it
- serves the files that you already deployed
When you make your website public, you are effectively attaching a public URL to the files that you have already uploaded and previewed. As a consequence, all later website versions that you deploy will automatically appear public as well.
You can choose from two available publishing options:
- As a subdomain of kinveyweb.com
- Using a custom domain and TLS certificate
Publishing Under Kinveyweb.com
You can make your website public by utilizing kinveyweb.com sub-domains. This is an integrated way to easily get a public-facing URL for your website. It does not require purchasing a domain or an TLS certificate.
Example URL:
https://example.global.kinveyweb.com
Note that the global part in the URL differs based on the Kinvey instance that you are using.
To publish a website:
- On the Kinvey Console main screen, select the Websites tab.
- Open the website that you want to publish.
- On the Public Access tab, click Enable Public Access.
- Select Kinvey from the Domain type drop-down list.
- Enter the subdomain that you want to use and then click Enable Public Access.
Note that the subdomain name that you choose must be unique throughout the Kinvey instance that you use. For shared instances, this means that the name you want may already be reserved by another Kinvey customer. You get an error if you enter a subdomain name that is already in use.
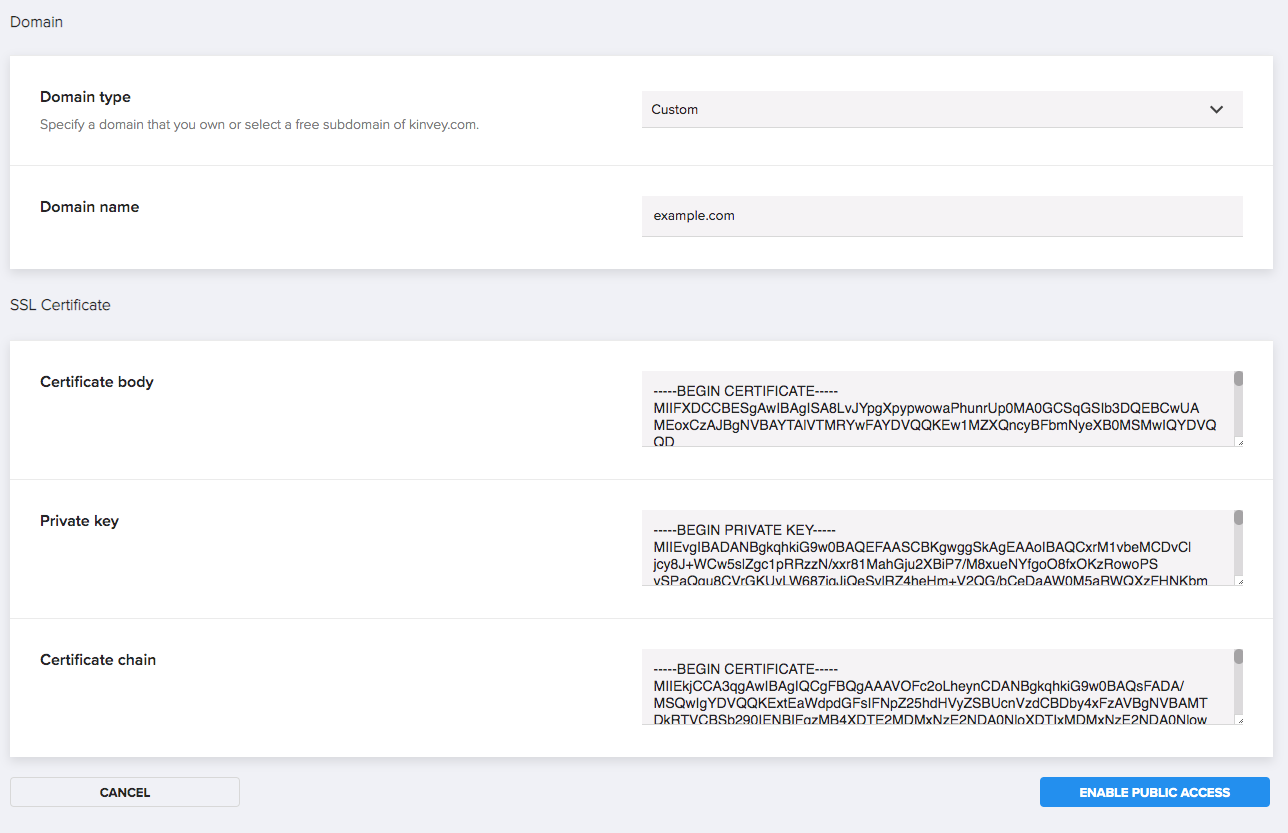
Publishing Under a Custom Domain
You can publish your website under a custom domain that you own or control. This setup requires you to have a domain and TLS certificate obtained outside of Kinvey.
Example URLs:
https://subdomain.example.comhttps://example.com
Note that, for improved security, Kinvey does not support publishing under a custom domain without providing a TLS certificate for this domain.
To publish a website:
- On the Kinvey Console main screen, select the Websites tab.
- Open the website that you want to publish.
- On the Public Access tab, click Enable Public Access.
- Select Custom from the Domain type drop-down list.
Enter the required information and then click Enable Public Access.
The Public Key length is limited to 2048 bits.Follow the instructions to set up your DNS server for your domain. For more information, go to the DNS Configuration section.
DNS Configuration
To use a custom domain, you need to set up your DNS server to point domain visitors to the Kinvey servers. The setup steps depend on your DNS server of choice and Kinvey cannot perform them automatically. Kinvey Console does its best to provide you with pointers as to how to set DNS. It also verifies whether the current DNS configuration is correct for the publish domain.
The DNS configuration involves creating a CNAME record that points to the Kinvey servers with the help of your domain's administration panel or DNS server configuration utility. If you are unsure how to do that, contact your system administrator. The exact CNAME record to add varies for each website. Kinvey Console shows it at the end of the publishing process.
To set up your domain's DNS:
- From Kinvey Console, publish the website on your custom domain, following the steps in Publishing Under a Custom Domain.
After completing the last step of the publishing process, Kinvey Console presents you with steps to configure you domain's DNS.
Either follow the steps yourself or ask your system administrator to do that. Even if you dismiss the steps, you can bring them back using the dedicated button on the Publishing tab.
In Kinvey Console, go to the Publishing tab and ensure that you see Valid under DNS Configuration.
After you complete the DNS setup, you should be able to navigate to your website using the domain name you specified.
Managing Your TLS Certificate
When publishing under a custom domain, you need to provide a valid TLS certificate for it. Kinvey will not allow you to publish a website without a certificate or with a certificate that has expired or has been issued for a different domain.
TLS certificates are issued for finite periods of time and they expire. If your certificate expires, web browsers will start to distrust your website, making it appear as insecure to your visitors. You are advised to update the certificate before that happens.
Kinvey Console warns when your certificate is less than 30 days away from expiring or if it has already expired. The warning is visible on the Overview and Publishing tabs.
To renew your TLS certificate:
Issue a new TLS certificate for your website or ask your system administrator to do it.
You should be able to do this up to 90 days before the current certificate expires.
In Kinvey Console, open the website that you want to renew the certificate for and navigate to the Publishing tab.
- Click Edit and paste the certificate body, private key, and certificate chain for the new certificate.
- Save the changes.
Kinvey poses the following limitations on TLS certificates:
- Self-signed certificates are not supported
- Only RSA public/private key pairs are supported
- Public key length must not exceed 2048 bits
- The private key cannot be password-encrypted
Unpublishing a Website
In Kinvey terms, unpublishing means dropping the website's public domain. Note that the website will continue to be publicly accessible at the preview URL.
To unpublish a website:
- On the Kinvey Console main screen, select the Websites tab.
- Open the website that you want to unpublish.
- On the Public Access tab, click Disable Public Access.
Advanced Configuration
Index and Error Pages
You can control the filenames for the index and error pages of your website.
Index Page
The index page is the initial page that gets displayed when visitors load your website without specifying a particular page. The default filename for the index page is index.html.
Example:
Website URL: admin-panel.example.com
Website index page: index.html
Result: https://admin-panel.example.com returns the content of https://admin-panel.example.com/index.html
To change the name of the file to display as an index page:
- On the Kinvey Console main screen, select the Websites tab.
- Open the website that you want to configure.
- On the Routing tab, type the file name in the Index page text box.
You can also specify an index file name with the --indexPage option when creating the website using Kinvey CLI.
Error Page
The error page is the page that gets displayed when an error occurs. The default filename for the error page is error.html.
The most frequent use of the error page for static websites is for presenting a friendly page when a customer requests a page that does not exist (HTTP code 404).
To change the name of the file to display as an error page:
- On the Kinvey Console main screen, select the Websites tab.
- Open the website that you want to configure.
- On the Routing tab, type the file name in the Error page text box.
You can also specify an error file name with the --errorPage option when creating the website using Kinvey CLI.
History API Routing
A lot of web application frameworks use the HTML5 History API to implement client routing. Examples include:
- PathLocationStrategy in Angular
- BrowserRouter in React
- History mode in vue-router for Vue
Using a history-based routing strategy makes the URLs of your website look more user-friendly. This is achieved by appending sections to the website's base URL without making actual requests to the server. The resulting URL looks comprehensible, but does not point to a valid resource on the server.
Without explicit server-side support, an error occurs as soon as such a user-friendly URL is used (for example, the page is refreshed or the URL is shared with someone). Kinvey Web Hosting enables support for this scenario through the History API Routing option.
Enabling the option tells Kinvey to start returning the index page for all requests to non-existing pages on the server. After the index page loads, the client-side routing takes over to navigate to the proper client view.
When History API Routing is enabled, the error page option is no longer respected. The index page is returned even for errors, meaning you have to handle all errors on the client.
To enable or disable History API Routing:
- On the Kinvey Console main screen, select the Websites tab.
- Open the website that you want to configure.
- On the Routing tab, enable or disable History API Routing.
You can also enable History API Routing with the --historyApiRouting option when creating the website using Kinvey CLI.
CI/CD for Websites
You can implement a CI/CD flow for your websites using Kinvey CLI. You can find more information about the relevant CLI commands in the Kinvey CLI documentation.