 Docs
Docs
Business Logic
Introduction
Kinvey Business Logic is a node.js code execution runtime that allows you to customize the behavior of requests to your backend by providing a means to implement server-side business logic. Kinvey Business Logic enables developers to focus on the unique functional business logic of a mobile application, while Kinvey handles the work of receiving, parsing, and routing requests, connecting to and querying data stores, and enabling mobile-specific functionality.
Business Logic is commonly used to enable:
- Triggering messages such as email and push notifications on developer-defined changes in the data store.
- Optimizing the data exchange with the app by joining multiple data collections.
- Validating app user actions to enforce business rules.
- Providing a means to host platform-agnostic code and save development time on multi-platform apps.
Business logic can be invoked as part of a request to a Kinvey collection, as a custom endpoint to execute an arbitrary function, as common code created and shared among BL functions, and on a scheduled basis.
Core Concepts
The Elements of a Business Logic Script
A business logic script in Kinvey is a single function that is executed as part of a client request, either as a hook to a collection request, or as a custom endpoint that is either directly invoked or scheduled to execute at a specific time or on a repeating basis. All Business Logic functions are passed three arguments that can be used as part of your business logic:
| Argument | Description |
|---|---|
| request | An object representing the request that came into Kinvey |
| response | An object representing the response that will be sent back to the client |
| modules | A series of API modules that can be used to manipulate or action on a request |
The request and response objects allow you to manipulate what comes in and goes out of the function. For example, in the below simple Hello World example, the response body is set to the contents of the request body, plus one additional key named hello with the value of world.
function onRequest(request, response, modules) {
  var requestBody = request.body; // this gets the JSON body of the request
  response.body = request.body;
  response.body.hello = 'world';
  response.complete(200);
}
So if the request sent to the client contained the body
{
  "name":"Bob",
  "department": "sales"
}
then the response received from the client would be
{
  "name":"Bob",
  "department":"sales",
  "hello":"world"
}
The modules argument provides a variety of libraries that can be used within your business logic. These include, but are not limited to:
- Kinvey-specific modules for accessing different elements of the Kinvey platform
- Control-flow modules such as async.js and the Bluebird promises library, used for controlling node.js asynchrony.
- Utility libraries for working with dates
- Data Validation libraries
- User engagement libraries for sending emails and push notifications
Best Practices
Business logic scripts are short-running scripts that are intended to augment the default functionality of Kinvey. When writing server-side business logic, it is important to take total request time into account, in order to provide a good user experience for the end-user.
While Kinvey Business Logic has a built-in timeout value that is measured in seconds, code should be written in such a way as to keep the total request time as low as possible in order to maintain a good user experience. In general, users can perceive any delay that is greater than 100 milliseconds, and most users consider anything that takes longer than one second to be slow. While it is sometimes necessary to perform tasks beyond these numbers, long-running requests should be kept to a minimum and the goal should be short, responsive API calls. To help keep requests short, you should:
- Make use of node.js asynchrony. Multiple asynchronous requests (such as collection access, external HTTP requests, etc.) should be parallelized if possible.
- Make use of the general collection hook flow when possible rather than custom endpoints. For example, if you need to combine the results from two collections, make a query request to the first collection, and query the second collection in a post-fetch hook.
- Avoid looping through large recordsets using for or forEach. Instead, use the
asyncmodule's each, eachSeries, and eachLimit functions along with node'sprocess.nextTick/setImmediate. - Keep business logic scripts short and atomic.
- Avoid returning large data sets to the mobile client. Mobile devices are optimized, both from a user experience perspective and a bandwidth perspective, to digest limited, relevant data sets rather than syncing entire copies of tables and/or collections.
Types of Business Logic
Business Logic is triggered in one of three ways:
- Collection Hooks, which are triggered by a request to any Kinvey collection and allow for server-side logic to occur pre/post fetch, pre/post save, pre/post insert, pre/post update and pre/post delete.
- Custom Endpoints, which are triggered on demand through a custom HTTP endpoint or via a function call in the client libraries.
- Scheduled Code: A means of executing a custom endpoint on a scheduled basis.
In addition, common code provides a means of creating a library of reusable functions that can be invoked from any collection hook or endpoint.
Collection Hooks
Collection hooks allow you to add server-side logic to Kinvey's collection request pipeline. Understanding this pipeline is essential for the effective use of Collection Hooks.
Configuring Collection Hooks
All Kinvey collection requests go through a similar processing sequence.
- Verify request is authenticated
- Perform any Before processing Collection Hook Business Logic
- Do internal Kinvey processing (this includes ACL verification, database interaction, data integration, etc)
- Perform any After processing Collection Hook Business Logic
- Format and send response to the client
You are able to insert your own code as either a Before or After processing action on a Kinvey collection.
To configure a collection hook via the console, find your collection under the Collection Hooks list in Business Logic. Use the Add Hook button next to the collection name to add a hook.


Invoking Collection Hooks
To invoke a collection hook, access the collection for which the hook is defined, and the appropriate hook for your action will be executed. For example, if you have defined an After Fetch hook for a collection named myCollection, your code will run every time data is retrieved (fetched) from the myCollection collection.
To know whether collection hooks were executed for a specific request, Kinvey will return an X-Kinvey-Executed-Collection-Hooks header as part of the response, containing a string with a comma-separated list of hooks (i.e. "Pre-Fetch, Post-Fetch" or "Post-Save"). If this header is not included in the response from Kinvey, then no collection hooks were executed as part of your request.
Login Hooks
The User collection is a special collection that, apart from the regular collection hooks, has specific "pre" and "post" hooks related to the user login event.
onPreLogin- executed before a user login request.onLoginSuccess- executed after a successful user login:- after a login request
- after a sign up request with API version 1 to 5. In those API versions the sign up request automatically logs in the newly created user
onLoginFailure- executed after a failed user login:- after a login request
- after a sign up request with API version 1 to 5 and only if the sign up request error is a result to failure to issue an access token
The login hooks processing flow
The login hooks will be executed whenever a user is logged in (a session token for the user is created and returned). This can happen with a login request or a user sign-up (create) request with API version 1 to 5.
Login request
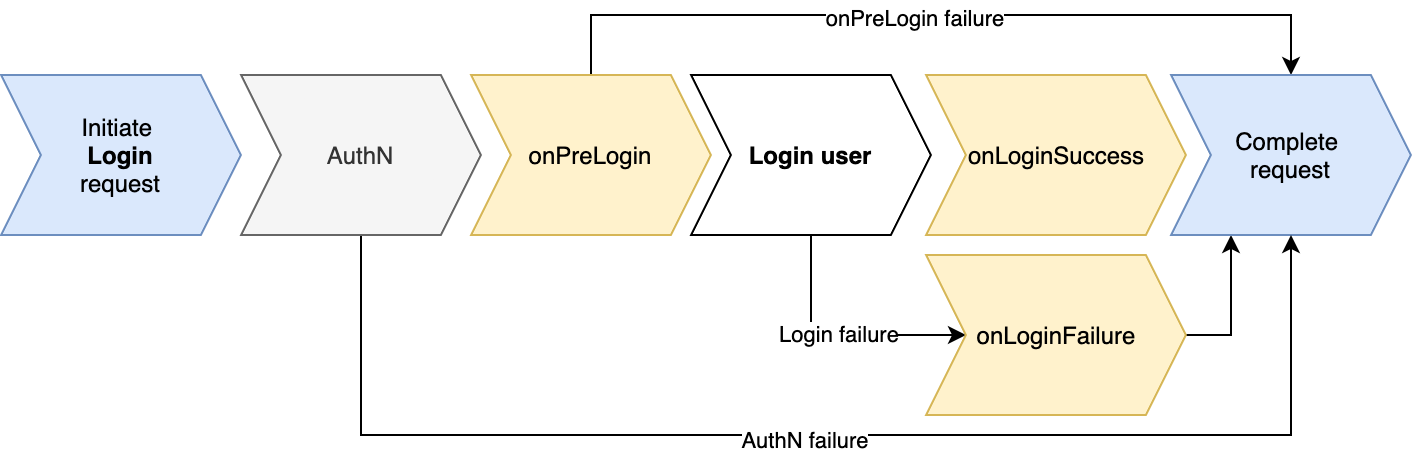
From the above diagram, we can see that:
- login hooks would not fire when the request itself fails to be authenticated - this can happen if the request's
Authorizationheader is wrong. - in case the
onPreLoginexecution returns an error response (it fails to execute because of aBlTimeoutErroror aSyntaxerror) or the custom code returns a status code greater or equal to 400, then the login process would be stopped, and a response is returned right away. As a result, theonLoginSuccessoronLoginFailurehooks would not fire.
Login request with MFA enabled
When user login requires Multi-factor authentication (MFA), the login flow changes from a single request to 3 separate requests. The login hooks would fire in the following sequence:

User sign-up request
When a user sign-up request is made (only for API version 1 to 5), the newly created user is automatically logged in, and a user session token is returned with the sign-up request. The flow looks like this:
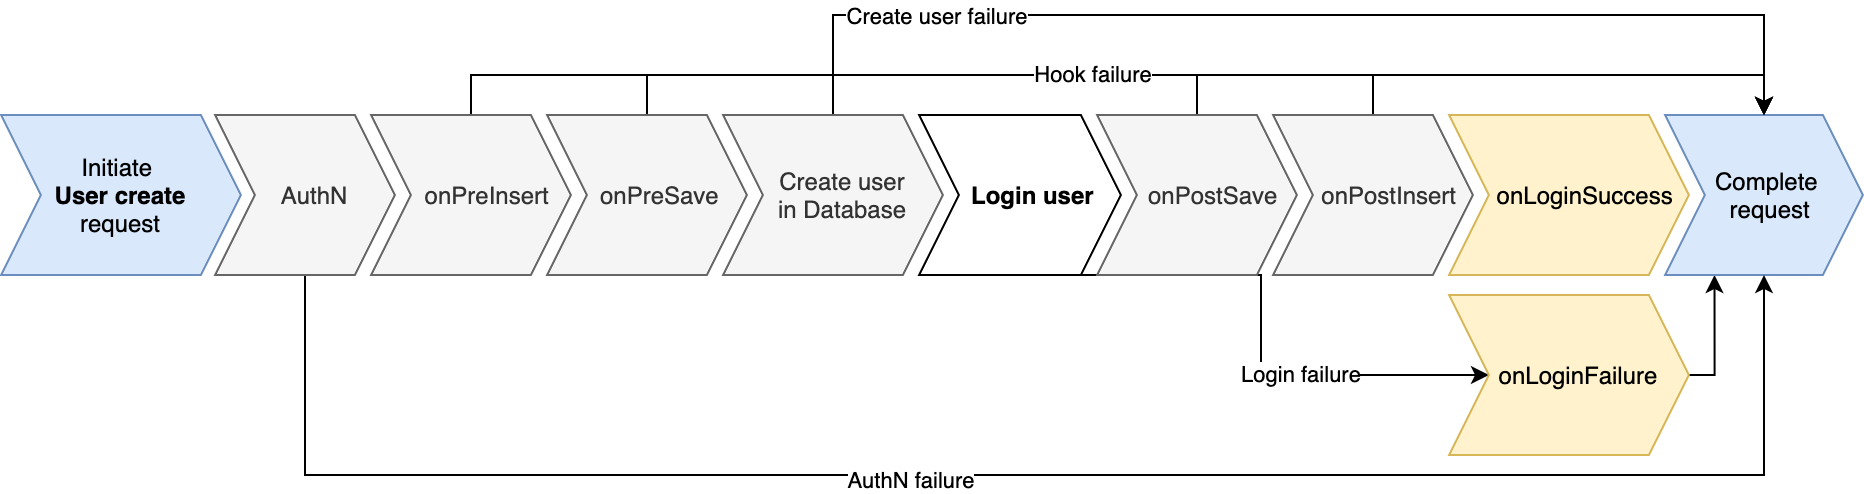
From the above diagram, we can see that:
onPreLoginis not executed in this case as this request is not, in essence, a login request.- if the request authentication fails (a wrong
Authorizationheader is used), the process is stopped. As a result, a response is returned right away. - if the request fails to create a user in the database, the
onLoginSuccessoronLoginFailurewould not fire. - the
onLoginSuccesswould fire if the creation of a user and issuing of a user session token succeeds. - the
onLoginFailurewould fire if the creation of a user is successful, but the request fails at issuing a user session token.
Difference with other collection hooks
Login hooks have a few differences compared to other collection hooks.
- Instead of one post hook, there are two different "post" hooks - onLoginSuccess and onLoginFailure.
loginOptionsproperty is available in the request context. The login options would hold the following information:loginOptions.type- indicate whether the login is with a Kinvey user (kinvey), MIC (kinveyAuth) or another provider -linkedInfor example.loginOptions.mfaRequired- indicate withtrueorfalsewhether a multi-factor authentication is required for this user. This property is visible inonLoginSuccessandonLoginFailurehooks.
No tempObjectStore between onPreLogin and post login hooks (onLoginSuccess or onLoginFailure).
The Custom Request Properties object will be available in
onLoginSuccessandonLoginFailureonly if the login does not use multi-factor authentication.
onLoginFailure
Unlike other collection hooks where the "post" login hook is fired only when the database operation succeeds, the onLoginFailure hook is fired if the login process fails.
The hook holds detailed information about the failing request. The following code would log the status code and the returned error:
function onLoginFailure(request, response, modules){
  var logger = modules.logger;

  logger.info(response.status);
  logger.info(response.body);

  response.continue();
}
Here is what the logged info would look like if the login error is due to invalid credentials:
401
{
  "error": "InvalidCredentials",
  "description": "Invalid credentials. Please retry your request with correct credentials.",
  "debug": ""
}
The login process can fail for various reasons:
| Code | Error | Description |
|---|---|---|
| 400 | InvalidRequestBody | Invalid or expired code. |
| 400 | IncompleteRequestBody | The body of the request is missing credentials required to login |
| 400 | IncompleteRequestBody | No request body. Login credentials expected in the request body |
| 400 | IncompleteRequestBody | No supported identity provider found |
| 400 | AuthenticatorNotVerified | The authenticator is not verified. Please specify a verified authenticator and retry the request. |
| 400 | MissingRequestParameter | The request must specify a code in the body. |
| 400 | MissingRequestParameter | Required field: authenticatorId. Please try again and include it in the request. |
| 400 | FeatureUnavailable | Two-factor authentication is required for this app but it is available from API version |
| 400 | FeatureUnavailable | Two-factor authentication is enabled for this user but it is available from API version |
| 400 | BadRequest | Can only login with only one external identity provider at one time |
| 401 | InvalidCredentials | Invalid credentials. Please retry your request with correct credentials. |
| 401 | InvalidCredentials | The specified recovery code is invalid. |
| 401 | InvalidCredentials | Specified credentials are not allowed to create a session |
| 401 | UserLockedDown | Access with these credentials has been disabled by an administrator. |
| 401 | EmailVerificationRequired | This app requires email address verification. Before performing any operations, please verify your email address by clicking the link sent to you upon signup. |
| 403 | MissingConfiguration | No authenticator has been chosen. |
| 500 | KinveyInternalErrorRetry | The Kinvey server encountered an unexpected error. Please retry your request. |
Invoking login hooks
You have to create a login hooks - choose the "user" collection. Then in order to invoke the login hooks, simply call a login request or a user sign-up (create) request.
Login hooks examples
Allow login with MIC only
Case-insensitive login on the server
Notify on successful login
Notify on login failure
Custom Endpoints
Custom Endpoints provide for the on-demand execution of server-side business logic. Custom Endpoints can be initiated via a REST request, or from the client libraries.
Configuring Custom Endpoints
To configure a custom endpoint via the console, go to the Endpoints list in Business Logic. Use the Add Endpoints button next to add an endpoint. You will be prompted to give the endpoint a name:

This will bring you to the editor, where you can input your business logic code.

Invoking an Endpoint
Endpoints are accessed through the URI scheme /rpc/:appKey/custom/:endpoint.
- the
endpointname is the same as custom endpoint. - the
appKeyshould be your application's appKey
Any required parameters can be passed in the request body in JSON format.
For example, if the request is:
POST /rpc/:appKey/custom/:endpoint HTTP/1.1
Content-Type: application/json
Authorization: [credentials]
Content-Type: application/json

{
  "name": "Fred Jones",
  "eyes": "Blue"
}
and the endpoint logic was
function onRequest(request, response, modules){
    modules.logger.info(request.body.name + " has " + request.body.eyes + " eyes.");
    response.complete(200);
}
it will cause the following to be written to the logs:
Fred Jones has blue eyes.Common Code
Common code can be used to create reusable functions that can be used across your business logic scripts. To configure common code via the console, go to the Common list in Business Logic. Use the Add Common button next to add common code. You will be prompted to give the common code a name:

An example of a common code function that adds two numbers is:
function add(a, b) {
  return a + b;
};
The add function can now be invoked from any collection hook or custom endpoint
function onRequest(request, response, modules) {
  // some BL code here
  var a = 1;
  var b = 2;
  var c = add(a,b);
  // more BL code here
}
Scheduled Code
Custom endpoints can be scheduled to run at specified times. You can select a start date and time as well as recurrence interval (such as weekly or every 30 minutes).
To schedule an endpoint, navigate to BUSINESS LOGIC > Scheduled Code and click the Add Scheduled Endpoint button at the top right of the screen.
Keep in mind that the start date and time is in your local computer time and time zone, as shown conveniently in the dialog window. If you need to schedule the job to run at a specified time in another time zone, don't forget to factor in the time offset.

You can find more examples in the Get Started with Scheduled Code tutorial.
Scheduled jobs have the following limitations:
- A single environment of a Kinvey app cannot have more than 50 jobs.
- Inactive scheduled endpoints (such as one-time jobs that have already been executed) are deleted 60 days after their last execution.
Writing Business Logic
Business Logic (BL) provides a Node.js runtime for executing your server-side code. The code executes inside a container that is destroyed immediately after use. All Node.js core libraries are available, but some (such as file access, console access, setting up an HTTP or TCP server, etc.) have no practical effect due to the ephemeral nature of Business Logic. Additionally, Kinvey currently does not support the addition of custom npm modules to BL code. Otherwise, the full Node.js stack is available within the context of a collection hook or endpoint.
Understanding Asynchrony
Because it is based on Node.js, Kinvey Business Logic makes heavy use of asynchronous JavaScript patterns. In general, calls that require I/O (database access, web requests, etc.) are executed asynchronously while code execution continues. Upon completion of the asynchronous call, a callback function is invoked. Consider the output of the following example code:
function onRequest(request, response, modules) {
  modules.request.get('http://www.somedomain.com', function(err, result) {
    modules.logger.info("Request finished");
    return response.complete();
  });

  modules.logger.info("Continuing code execution");

}
Log output:
Continuing Code Execution
Request Finished
This is because as soon as the call is made to invoke a request to http://www.somedomain.com, code execution continues with the statement to log "Continuing code execution". Once the request is finished, the statement "Request finished" will be logged, and BL execution will be completed.
This asynchronous callback mechanism allows for the optimization of request time but can also lead to many errors. For example, if we moved the return statement in the above code as follows, the callback for the request would never be invoked. Outside of asynchronous calls with callbacks, code in Node.js executes synchronously to completion.
function onRequest(request, response, modules) {
  modules.request.get('http://www.somedomain.com', function(err, result) {
    modules.logger.info("Request finished");
});

  modules.logger.info("Continuing code execution");
  return response.complete();
}
Completing Business Logic
As shown above, JavaScript code often uses callbacks that are invoked
when processing completes. Since Kinvey can't know when a database or network request
will complete, Kinvey doesn't know when your logic is done running. To counter this you
must return either response.complete, response.continue, or response.error when your logic is finished executing.
return response.complete(statusCode)—Stop processing this request further and returnresponseto the client. The HTTP status code is set tostatusCode.return response.continue()— Continue normal Kinvey request processing. This is only valid within collection hooks and is not available for custom endpoints.return response.error(error)—Stop processing this request further and return an HTTP 400 error to the client with a user-defined error message. Details on user-defined errors can be found in the Throwing Errors section of this guide.
response.complete, response.continue, or response.error is not returned within the timeout period, your logic will be terminated and the client will be notified that processing timed out.
Business Logic Errors
Handling Errors
If an error occurs during execution of your Business Logic code, we return an HTTP status code and a JSON error response to the client.
The HTTP status codes returned are:
| Code | Description |
|---|---|
| 400 | There was a runtime error in the Business Logic (probably triggered by a request) you should modify the request on the client and resubmit (or verify your code has no logic errors) |
| 500 | There was an internal error within the Kinvey Business Logic system. Contact support@kinvey.com if this happens |
| 550 | There was a server side error with your code, you should verify the correctness of your code |
The format of the error response is:
{
    "debug": "",
    "description": "",
    "error": ""
}
Description is set to a descriptive message of the general failure, debug is set to the exact cause of the failure and error is one of:
| Error | Code | Description |
|---|---|---|
BLRuntimeError | 400 | There was a runtime error executing the JavaScript |
BLSyntaxError | 550 | There was a syntax error compiling the JavaScript |
BLTimeoutError | 500 | The backend processing failed to complete, please contact support@kinvey.com if you experience this error |
BLViolationError | 550 | The Business Logic violated a constraint |
BLInternalError | 550 | The Business Logic system experienced an internal error |
response.complete(400) or response.complete(550) will cause the client to see
an error identical to normal Business Logic errors. Make sure to check the error in the
response.
BLTimeoutError error, please contact support@kinvey.com.
Throwing Errors
At times, it may be necessary in your business logic code to throw an error back to the client. To accomplish this, your business logic code can return a User Defined Error to the client by calling response.error(err). This function either takes a String error message, or a JavaScript Error object or one of its subtypes. Errors are returned using the standard Kinvey error response format in the message body, with a response code of 400 (Bad Request). For example, the following code:
if (!myTestCondition) {
  return response.error("my custom message");
} else {
  return response.complete(200);
}
will produce a response.body of:
{
    "error": "BLRuntimeError",
    "description": "The Business Logic script has a runtime error. See debug message for details.",
    "debug": "UserDefinedRuntimeError:  my custom message"
}
If a JavaScript object such as a TypeError is passed, the response.body will reflect the JavaScript error type:
if (!myTestCondition) {
  var myError = new TypeError("Invalid Object Type");
  return response.error(myError);
} else {
  response.complete(200);
}
{
"debug": "BLRuntimeError",
"description": "The Business Logic script has a runtime error. See debug message for details.",
"error": "TypeError: Invalid Object Type"
}Change notification
Kinvey has the ability to send email notifications to collaborators in an app whenever a BL script changes. To enable this functionality for your app, please contact Kinvey support.
Logging
The BL logger module offers a set of logging functions that can write log messages at different severity levels. The logger module is the only way to log in BL.
Viewing Logs
Use the Kinvey Console to view Business Logic logs.
Take these steps:
- In Kinvey Console, open the app environment that you are working in.
In the left-hand side navigation, select the type of Business Logic whose logs you want to see: Collection Hooks or Scheduled Code.
Common Code is always a part of Collection Hooks or Scheduled Code. To view messages generated by common code, go to the Collection Hook or Scheduled Code that uses it.
In the list that appears, select the routine whose logs you want to view.
Find the log messages in the lower pane.
Using the pane controls, you can filter by severity level or search the messages. You can also irreversibly delete all logs. If you don't, older messages are automatically deleted when the maximum size limit is reached.
Retention Policy
The logger log entries are stored on the Kinvey servers and are subject to some restrictions, as described below.
- The number of log messages is capped at 10,000 entries for all BL routines inside an app environment.
- The cumulative size of all messages cannot exceed 5 MB for all BL routines inside an app environment.
If any of the restrictions is reached, the system starts deleting the oldest entries to make room for new entries.
logger and other output that is generated during the operation of the Node.js runtime, such as stdout.
Logging Messages
The logger module provides a different logging function for each severity level: info(), warn(), error(), fatal(). Each of them takes a string argument representing the log message and a callback. You can also pass an instance of Error directly, and it will be automatically stringified.
The following example defines a function that deletes entities older than a specified number of days. It reads the number of days from the request body. The logger functions are used three times: to log an info-level message indicating each function execution, an error-level message containing the stringified error in case of failure, and another info-level message with the response body in case of success.
function deleteOldItems(request, response, modules) {
    modules.logger.info('Executing deleteOldItems Flex function');

    const deleteBefore = request.body.deleteBefore;
    query = {'_kmd.ect': {"$lte": deleteBefore}};

    const bookStore = modules.collectionAccess().collection("Books");
    bookStore.remove(query, function(err, count) {
        if (err) {
            modules.logger.error('Delete failed: ' + JSON.stringify(err));
            return response.error(err);
        } else {
            const response = {'Deleted records': count};

            modules.logger.info('Deletion succeeded: ' + JSON.stringify(response.body));
            return response.complete(200);
        }
    });
}
Testing Business Logic
After you complete a custom endpoint or a collection hook, you will want to test the code before sending it out to your live environment. Kinvey Console lets you do that using a Testing facility, which is a part of every custom endpoint or collection hook. If you want to test Common Code, test the custom endpoint or collection hook that includes it.
Testing Custom Endpoints
Take these steps:
- In Kinvey Console, open the app environment that you are working in.
- In the left-hand side navigation, select Business Logic > Custom Endpoints.
- In the list that appears, select the routine that you want to test.
Click Testing above the code pane.
A Test Settings sidebar appears.
Complete the settings and then click Send Request.
| Setting | Description |
|---|---|
| POST/PUT | Choose the HTTP verb for the request. |
| Authentication | Select whether to run the request as a superuser (Master Secret), a specific app user (User Session or MIC, depending on the identity provider), or App Secret1. 1Only applicable to collection hooks. |
| Query String | Request parameters that populate the request.params object. Use standard HTTP parameters encoding format: ?paramName1=value1¶mName2=value2&.... You can access each parameter using request.params.paramName` in your code. |
| Request Body | Request body in JSON syntax that populates the request.body object. Ex: { "key1": "string1", "key2": 123 }. You can access each body value using request.body.key in your code. |
Testing Collection Hooks
Take these steps:
- In Kinvey Console, open the app environment that you are working in.
- In the left-hand side navigation, select Business Logic > Collection Hooks.
- In the list that appears, select the routine that you want to test.
Click Testing above the code pane.
A Test Settings sidebar appears.
Complete the settings and then click Send Request.
| Setting | Description |
|---|---|
| Authentication | Select whether to run the request as a superuser (Master Secret), a specific app user (User Session or MIC, depending on the identity provider), or using the App Secret1. 1Only applicable when testing Pre- or PostSave collection hooks for the Users collection. Read more |
| Query String | Request parameters that populate the request.params object. Use standard HTTP parameters encoding format: ?paramName1=value1¶mName2=value2&.... You can access each parameter using request.params.paramName` in your code. |
Examples
Business Logic is designed to help you perform tasks on the server that are either not possible or inefficient on a client. To use an example, just copy the code into the listed function for the collection that should trigger the logic.
Business logic code (both Collection Hooks and Custom Endpoints) are managed in the Business Logic section of the console, under their respective folders. To create new hooks or endpoints, click the plus next to their respective folder names and follow the prompts.
onPreSave, onPostFetch, etc) will only be triggered by a request of the same type (save, fetch, or delete) to the collection where the function is defined. Collections listed in the examples are other collections referenced in the
logic don't need to be the same collection where the logic is defined.
Allow login with MIC only
In the login hook, there is a specific loginOptions.type property that holds information about the user login type. loginOptions.type has information about whether the login is with a Kinvey user (kinvey), MIC (kinveyAuth) or another provider - linkedIn for example.
In onPreLogin you may filter out users based on their credentials type, using theloginOptions.type property - whether it is a pure Kinvey user or a user that is trying to login with Mobile Identity Connect:
function onPreLogin(request, response, modules) {
  if (request.loginOptions.type === 'kinveyAuth') {
    // Allow login with MIC
    return response.continue();
  }

  // Not using MIC
  response.body = {
    error: 'KinveyUserLoginNotAllowed',
    description: 'You are trying to login using Kinvey credentials (username and passwrod). Only login with external identity provider is allowed.',
    debug: ''
  };
  response.complete(403);
}
Case-insensitive login on the server
Using the onPreLogin hook you may convert the username to lowercase letters only on one place on the server:
function onPreLogin(request, response, modules) {
  var lowerCaseUsername = request.body.username.toLowerCase();

  request.body.username = lowerCaseUsername;
  response.continue();
}
Notify on successful login
In onLoginSuccess, you may notify the user for successful login.
function onLoginSuccess(request, response, modules) {
  var from = 'my-app@app.com';
  var reply_to = from;
  var to = response.body.email;
  var subject = 'Successful login to my-app';
  var text_body = 'User ' + response.body.username + ' has successfuly logged-in in my-app';

  modules.email.send(from, to, subject, text_body, reply_to, function(err, result) {
    response.continue();
  });
}
Notify on login failure
In onLoginFailure, you may notify the user for login failed login attempts. You may also filter out when to notify the user - in the example below, the user will get an email notification only when he enters Invalid credentials.
function onLoginFailure(request, response, modules) {
  if (response.body.error == 'InvalidCredentials') {
    var from = 'my-app@app.com';
    var reply_to = from;
    var to = response.body.email;
    var subject = 'Unsuccessful login to my-app';
    var text_body = 'User ' + response.body.username + ' attempted to login in my-app but the login failed due to invalid credentials';

    modules.email.send(from, to, subject, text_body, reply_to, function (err, result) {
        response.continue();
    });
  }
}
Providing a test end-point
function onRequest(request, response, modules){
    response.body = {"someValue": "someOtherValue"};
    response.complete(201);
}
Any POST received by this endpoint just returns a 201 status with the
response body of:
{
    "someValue": "someOtherValue"
}Requesting data from an API
function onRequest(request,response,modules){
    var req = modules.request;
    req.get('http://developer.mbta.com/Data/Red.json', function(error, resp, body){
        if (error){
            response.body = {error: error.message};
            response.complete(400);
            return;
        }
        response.body = JSON.parse(body);
        response.complete(resp.status);
    });
}
This requests the MBTA Red Line real-time subway feed, parses the JSON response and sends this JSON to your client.
Posting data to an API
function onPreSave(request, response, modules){
  var endpointName = 'isCreditAvailable';
  var uriString = 'https://baas.kinvey.com/rpc/' +
    modules.backendContext.getAppKey() + '/custom/'+endpointName;
  var opts = {
    uri: uriString,
    method: 'post',
    headers: {
      'Authorization': request.headers.authorization
    },
    json:true,
    body: { "userid": request.body.userid, "balance": request.body.balance }
  };

  modules.request.request(opts, function( err, resp, body ) {
    if (err) {
      response.body = err;
    } else if (response.body.valid === true) {
      response.continue();
    } else {
        response.error("No balance remaining.");
       }
  });
}
This code sends a REST POST request using the request module to a custom endpoint for the purposes of validating if a particular account has credit available. Here, a request body in JSON format is provided, so json:true must be included in the request options. Authentication is passed through using the request.headers.authorization. Once the response is received, the request pipeline continues if there is balance available, and completes if there is not.
Triggering push notifications
function onPreSave(request,response,modules){
    var collectionAccess = modules.collectionAccess
    , userCollection = collectionAccess.collection('user')
    , utils = modules.utils
    , push = modules.push
    , template = '{{name}}, the {{team}} just won!'
    , pushedMessageCount = 0
    , userCount;


    // Find all users who's favoriteTeam matches
    // the incoming request's winning team.
    userCollection.find(
        {"favoriteTeam": request.body.winningTeam},
        function(err, userDocs){
        // Total number of messages to send
        userCount = userDocs.length;

        // Each message is customized
        userDocs.forEach(function(doc){
            var values = {
                name: doc.givenName,
                team: doc.favoriteTeam
            };

            // Render the message to send
            var message = utils.renderTemplate(template, values);

            // Send the push
            push.send(doc, message);

            // Keep track of how many pushes we've sent
            pushedMessageCount++;

            // reduce the number of users left to push to
            userCount--;
            if (userCount <= 0){
                // We've pushed to all users, complete the request
                response.body = {
                    "message": "Attempted to push " +
                    pushedMessageCount +
                    " messages."};
                response.complete(200);
            }
        });
    });
}
This sends a push notification to all users who match the winning team provided by a POST or PUT (also known as save in Kinvey client libraries) to a collection. Instead of saving any data to the data store, this request just causes the push notification to be sent.
The body of the request must have a winningTeam property, like:
{
    "winningTeam": "Boston Red Sox"
}
Users are expected to have a givenName property and a favoriteTeam property.
The Push notification will be similar to:
Joe, the Kansas City Royals just won!Triggering email notifications
function onPostSave(request,response,modules){
    var i, to, logger = modules.logger, email = modules.email;
    for (i = 0; i < request.body.to.length; i++){
        to = request.body.to[i];
        logger.info("Sending e-mail to: " + to);
        email.send('my-app-invitation@my-app.com',
                   to,
                   request.body.subject,
                   request.body.body,
                   request.body.reply_to);
    }
    response.continue();
}
This sends an email to an array of email addresses on a POST or PUT
(also known as save in Kinvey client libraries) to a collection. The body of the
request should be similar to:
{
    "to": ["email1@example.com", "email2@example.com"],
    "subject": "This is a test email!",
    "body": "Please attend my event @ http://url.shorten/llayhshd",
    "reply_to": "event-creator@event-host.com"
}Merging data in two collections
function onPostFetch(request, response, modules){
    var collectionAccess = modules.collectionAccess
      , logger = modules.logger
      , body = request.body
      , resultA = null, resultB = null, callback;

    callback = function(){
        if (resultA && resultB){
            // Got both responses
            response.body = {things: resultA, stuff: resultB};
            response.complete(200);
        } else {
            // Still waiting for the other response.
            return;
        }
    };

    collectionAccess.collection('Things')
                    .find({name: body.thing}, function (err, docs)
    {
        if (err) {
            logger.error('Query failed: '+ err);
            response.body.debug = err;
            response.complete(500);
          } else {
            resultA = docs;
            callback();
          }
    });

    collectionAccess.collection('Stuff')
                    .find({name: body.stuff}, function (err, docs)
    {
        if (err) {
            logger.error('Query failed: '+ err);
            response.body.debug = err;
            response.complete(500);
          } else {
            resultB = docs;
            callback();
          }
    });

}
Give a request with a body of {"thing": "something", "stuff": "everybody's got stuff"},
this fetches the matching things and stuff from the datastore and then returns them to the
client with a status code of 200.
Denying access to a user
function onPreFetch(request, response, modules){
    var collectionAccess = modules.collectionAccess
      , logger = modules.logger
      , username = request.username;  // Set by Kinvey

    collectionAccess.collection('bannedUsers')
                    .find({user: username}, function (err, docs)
    {
          if (err) {
            logger.error('Query failed: '+ err);
            response.body.debug = err;
            response.complete(500);
        } else {
            if (docs.length > 0){
                // Banned user
                response.body.reason = docs[0].reason; // Just show the 1st reason
                response.complete(403);
            } else {
                // Not banned, let it through
                response.continue();
            }
        }
    });
}
This checks for the presence of the current user in the bannedUsers collection and
rejects the request with a status code of 403 if the user is banned. It also reports the
reason in the response body.
Returning the values deleted
function onPreDelete(request, response, modules){
    var collectionAccess = modules.collectionAccess
      , logger = modules.logger
      , query = request.params.query;

    collectionAccess.collection('thisCollection')
                    .find(query, function (err, docs)
    {
        if (err) {
            logger.error('Query failed: '+ err);
            response.body.debug = err;
            response.complete(500);
        } else {
            modules.utils.tempObjectStore.set('recordsDeleted', docs);
            response.continue();
        }
    });
}

function onPostDelete(request, response, modules){
    response.body = modules.utils.tempObjectStore.get('recordsDeleted');
    response.complete(200);
}
This runs the query that will be deleted against the datastore and stores the results in
the tempObjectStore. The onPostDelete function extracts those and returns them to
the client.
Returning a Kinvey Entity
When adding external data, whether generated through Business Logic or via an external API request, it is necessary to add Kinvey metadata to the object before submitting it to a Kinvey collection. The kinveyMetadata method can be used to return a skeleton object consisting of only Kinvey metadata, return a skeleton object with a user-assigned ID, or add/update Kinvey metadata on an existing JSON object. For example:
function onPreFetch(request,response,modules){
  var req = modules.request;
  var entity = modules.utils.kinveyEntity;
  req.get('http://api.openweathermap.org/data/2.5/weather?q=Boston,ma',
      function(error, resp, body){
    if (error){
      response.body = {error: error.message};
      response.complete(400);
      return;
    }
    response.body = entity(JSON.parse(body));
    response.complete(resp.status);
  });
}
This example requests the current weather forecast for Boston, MA from OpenWeatherMap, parses the JSON response, and adds the Kinvey Metadata attributes before sending this JSON to your client.
Manipulating Date/Time Values
To easily manipulate dates in Business Logic's JavaScript environment, use the module moment.
function onPostFetch(request, response, modules){
  var moment = modules.moment();
  var exp = response.body[0].trialExpiration;
  if (moment.add('days', 30).isBefore(exp)) {
    response.continue();
  } else if (moment.add('days',30).isAfter(exp) && moment.isBefore(exp)) {
      var body = response.body[0];
      body.warning = "Your trial will expire within the next 30 days."
      response.body[0] = body;
      response.continue();
  }else {
      response.error("Trial Period Expired.  Access Denied.");
  }
}
For more information on the moment module, see the reference
Executing Asynchronous Functions
The async module utilizes async.js to simplify parallel and asynchronous programming within the business logic context. This module provides convenience methods for asynchronous functional methods (map, reduce, filter, each, etc) as well as some common patterns for asynchronous control flow (parallel, series, queue, etc…). For example:
function onPostFetch(request, response, modules){
  var async = modules.async;
    var body = response.body;
  var moment = modules.moment().format();
  var logger = modules.logger.error;

  var iterator = function(item, callback) {
    item.fetchTime = moment;
    callback();
  };

  var callback = function (err) {
    if (err) {
        logger(err);
    } else {
      response.body = body;
    }
    response.continue();
  };

  async.each(body, iterator, callback)
}
This request uses async.js after fetch of a collection or query of a collection to add a fetchTime timestamp to each record in the collection. By using the async.js each method, iterations through the response body are processed in parallel, improving response time and ability to update larger record sets in BL.