 Docs
Docs
Users
User management is central to any application and central to Kinvey's backend-as-a-service.
The user management API has methods for handling typical user actions such as signup, login and logout. Using the API is as simple as calling each of those methods from the respective form and button in your app. An active user provides context for each interaction with your backend, ensuring that security is enforced and unauthorized access is disallowed. By default, a user's data is readable but not writable by other users.
A user object and its properties such as first name, last name and email are represented in the backend as an entity, and as such, most of the entity methods such as fetch and save apply.
Active User
The library has a concept of an active user which represents the person using your app. There can only be one active user at a time. All backend API calls are made with the credentials of the active user, enforcing the corresponding access control.
The active user can be obtained by calling Kinvey.User.getActiveUser(). Note that the resolved user may not necessarily reflect the latest user data on Kinvey. To refresh the active user, call user.me.
Kinvey.User.getActiveUser() before you have initialized the library it will always return null. Please refer to the Getting Started Guide on how to initialize the library.
Kinvey.User.getActiveUser() returns a promise with SDK version 6.0.0 or newer. Before that it was synchronous.
Promise.resolve(Kinvey.User.getActiveUser())
    .then(function (activeUser) {
        if (activeUser !== null) {
            // me() method makes a request to the server. If user credentials have expired, the request will fail with 401.
            return activeUser.me();
        } else {
            // login user
        }
    })
    .then(function (activeUser) {
        // ...
    })
    .catch(function (error) {
        // ...
});Explicit vs. Implicit
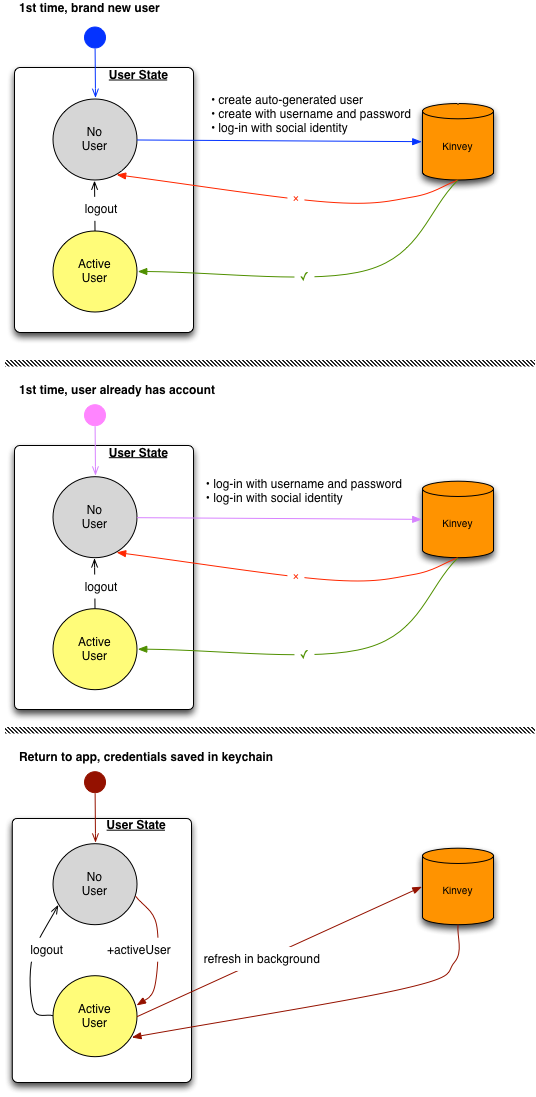
There are two ways to set the active user in the library:
- An explicitly set active user is one that your application will log in using a regular username and password on a login form, or via a social login through Facebook, Google, Twitter, LinkedIn.
- An implicitly set active user is created by the library. This action happens upon the first login that the app makes from a device. The username and password of the implicit user are randomly generated.
Apps that have no explicit notion of user registration and identity, like mobile single-player games, can simply utilize the implicit login without any credentials.
For all other practical purposes the implicit user is the same as any other user; the complete user entity is cached locally, it can have custom attributes and it can be a destination for push notifications. Since an implicit login contains no credentials, it is lost upon uninstalling the application or calling logout.
The following diagram shows how the flow differs for each way to set the active user:
User class
The library represents users by a User class.
var user = new Kinvey.User({
  _id: 'user-id',
  _acl: { /* ACL */ },
  _kmd: { /* Metadata */ },
  email: 'email'
});
The following user fields have specific semantics in the backend:
username- the username of the user, used in signup and login.password- the password of the user, used in signup and login.email(optional) - the user's email address, used for email verification, password reset, and Business Logic.first_name(optional) - the user's first name, used for user discovery.last_name(optional) - the user's last name, used for user discovery.
You can add additional data on the user object using the data property. For example:
var user = new Kinvey.User();
user.data.customProp = 'foo';
You can retrieve the data of a user by accessing the data property.
var user = new Kinvey.User();
var userData = user.data;
Saving the User
Once the user object is modified, for those changes to make it to the server, it needs to be saved.
// Update the active users’ age.
var promise = Kinvey.User.update({
  "age": 21
})
  .then(function(user) {
    // ...
  })
  .catch(function(error) {
    // ...
  });
Authentication
When a user first installs and runs your app, a login context must be established. For new users, this is done through signup. For an existing user, this can be accomplished with login.
User class. An active user is set on the Kinvey client only after a login attempt is successful. Once there is an active user, operations can be performed on the User instance.
User Sessions
User sessions allow you to secure access to the app using authorization tokens that can be controlled on a per session basis. Each session, beginning with a login and ending with a logout, allows you to model well defined periods of user engagement in the app.
To set the user session expiration time on App level (applied to all environments in the app):Kinvey Console -> App Settings -> Manage App -> User session timeout
To set the user session expiration time on Organization level (applied to all apps in the organization):Kinvey Console -> Organization settings -> Settings -> User session timeout
Generally, a user's session ends when it expires or when logout is called. It is possible, though, to terminate all of the user's sessions at once. Subsequent requests that use any of the destroyed tokens will be rejected.
// get an instance of User
const user = await Kinvey.User.getActiveUser();
await user.invalidateTokens();
// you need to login again the user
Signup
Signup creates a new user in Kinvey. If the username does not already exist in your app backend, a new user will be created.
If the user already exists, signup will result in an error.
_id, you should avoid values that are exactly 12 or 24 symbols in length. Such values are automatically converted to BSON ObjectID and are not stored as strings in the database, which can interfere with querying and other operations.
To ensure that no items with 12 or 24 symbols long _id are stored in the collection, you can create a pre-save hook that either prevents saving such items, or appends an additional symbol (for example, underscore) to the _id:
if (_id.length === 12 || _id.length === 24) {
  _id += "_";
}
var user = new Kinvey.User();
var promise = user.signup({
username: 'username',
password: 'password'
})
.then(function(user) {
// ...
})
.catch(function(error) {
// ...
});Sign up with Attributes
Optionally, when you sign up a new user, you can add a dictionary of attributes to be saved on the user at creation time.
var promise = Kinvey.User.signup({
  username: 'username',
  password: 'password',
  address: 'Boston MA'
})
  .then(function(user) {
    //...
  })
  .catch(function(error) {
    // ...
  });
Autogenerated Users
Apps that need to access data without requiring the user to log in can request automatically generated user. Autogenerated users are given a unique random username and password in Kinvey. On successful creation, the newly autogenerated user is set as the active user in the library.
var promise = Kinvey.User.signup()
  .then(function(user) {
    // ...
  }).catch(function(error) {
    // ...
  });
A user token is required to access any data, even if that data is shared or public. If you want to access data without requiring login or account creation up-front, we suggest the following workflow.
- Use signup to create an autogenerated user. Use this user to access and create data on the backend.
- When the app/user is ready to add personal information, update the user object's
usernameand other properties. - Save the user object.
- Before returning control flow to the app, reset the password.
Login
For existing users, the app needs to establish a login session before accessing data. Once a user logs in, the user context is cached on the device and subsequent uses of the app do not require another call to login.
var promise = Kinvey.User.login('username', 'password')
  .then(function(user) {
    // ...
  })
  .catch(function(error) {
    // ...
  });
Upon authentication, the response holds the user object.
Login is needed when a user exists in the app backend but has not been established in the application session. Common scenarios when this is necessary:
- The application launches and an active user is not yet established
- The application is reinstalled on the same or a new device for a user who already has an account established on the back-end
- The user has logged out and the application needs to make more calls to Kinvey
Once the user logs in successfully, the library sets the active user and caches the user's authentication tokens for subsequent use.
Login hooks
Login hooks allow you to add server-side logic right before or right after a user logs in.
Login hooks can be used for various tasks. For example:
- Restrict login for specific users - in
onPreLogin, you can return an error instead of continuing with the login process. - Implement failed login count - in
onLoginFailure, you may store a failed login count for the user in a separate collection or the user object itself. - Notify on failed login - send an email or push notification to a device.
- Notify on successful login - send an email or push notification to a device.
- Implement a case-insensitive mechanism for username on login in one place, on the server - in
onPreloginhook, convert theusernameto lower case. - Create a login log - in
onLoginFialureandonLoginSuccessadd an item to a “loginLog” collection.
More details on using login hooks can be found here.
Logout
Logout clears the active user and all related data, preventing other app users from accessing it. The deleted data includes:
- Cached tokens
- User attributes
- DataStore caches
- Offline data pending to be written to the backend
Logout has no effect if there is no active user.
The following snippet shows how to logout.
var promise = Kinvey.User.logout()
  .then(function() {
    // ...
  }).catch(function(error) {
    // ...
  });
Logout destroys the session’s associated auth token, such that subsequent attempts to re-use that token will yield a 401 Unauthorized (error) response.
When using a third-party Single Sign-On (SSO) identity provider (such as Ping Identity), the app’s logout action will destroy active session auth tokens within the Kinvey app, but SSO tokens may persist on third-party provider sites. Logout does not terminate tokens stored at third-party SSO websites using SAML or OAuth. Cookies that maintain these sessions may enable a logged out user to reopen a session and obtain a new session auth token. For instance, using Ping Identity with SAML-Redirect, the user will remain authenticated on Ping Identity website after logging out from the associated Kinvey application. This would enable a user to login to their Kinvey app after being logged out, i.e. if they remain logged in to Ping Identity.
Keep the following considerations in mind when using logout:
If your app needs to persist pending offline data, remember to push or sync the user's changes before logout.
To persist any user attributes that were modified after the last update, save the user before logout.
Recreate any DataStore instances used by your app after the user logs in again. DataStore instances maintain references to cache files which get destroyed on logout. Attempts to reuse the same instance of a DataStore may result in unexpected behavior.
If the user was subscribed to the live service, they will be unsubscribed on logout. You will need to resubscribe the user to the live service, on a fresh login.
User Lifecycle Management
You only need to remember the user if your app is explicitly setting the active user as explained in the active user section.
Once the application process is restarted, your app re-establishes the user context automatically and retrieves details about the user. At any time, you can refresh the metadata from the server by calling the me() method. This method requests an up-to-date copy of all user attributes from the Kinvey server.
Promise.resolve(Kinvey.User.getActiveUser())
    .then(function (activeUser) {
        if (activeUser !== null) {
            // me() method makes a request to the server. If user credentials have expired, the request will fail with 401.
            return activeUser.me();
        } else {
            // login user
        }
    })
    .then(function (activeUser) {
        // ...
    })
    .catch(function (error) {
        // ...
    });
Email Verification
Building email verification into your app ensures that your users provide you with correct and valid email addresses that they own during sign-up.
Configuration
The Console exposes several options that control how email verification is handled for your app. These options can be reached by navigating to the Users section and opening its Settings panel. The following settings are available under Email Verification:
Require Email Verification for sign in: by default, new apps do not enforce email verification. This means that while your users can go through the email verification process, any user can log into your app—regardless of whether or not their email address is verified. In order to restrict access only to those users who have successfully verified their email addresses, enable this option. Note that when this option is enabled, you will not be able to create a new user that does not have an email address.
- Always allow access to users created before a certain date: this option appears when you enable Require Email Verification for sign in. If enabled, any user created before the date you specify will be able to log into your app regardless of whether or not their email is verified. This option is intended to support apps with an existing user base in which users were not previously required to verify their email. The option will allow these existing users to log in, but require email verification from all new users created after the specified date.
Start verification automatically: if this option is enabled, a verification email is automatically sent when a user account is created, or when its email address changes. If this option is not enabled, you will need to manually initiate the email verification process for each user to verify their email address.
Customize Kinvey email verification: this section allow you to set up the email and web page templates that are used during the verification process.
Workflow
To request email verification, the user must have a valid email set in the email attribute. The following example shows how to send a verification email to the user.
Call verifyEmail with the username of the user eligible for a verification. The user must have a valid e-mail address set in the email attribute.
var promise = Kinvey.User.verifyEmail('username')
  .then(function() {
    // ...
  }).catch(function(error) {
    // ...
});This request starts the email verification process and causes an email to be sent to the user. The email requests that they confirm their email address by clicking on a link included in the email body. The link is served by Kinvey and is valid for five days from the time of the email. The email address for a user must be stored in a property named email user object field.
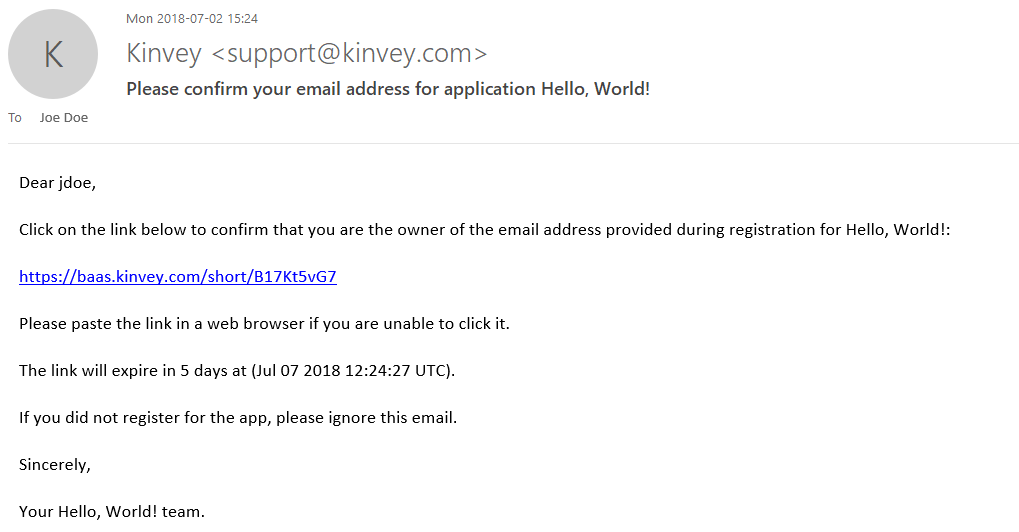
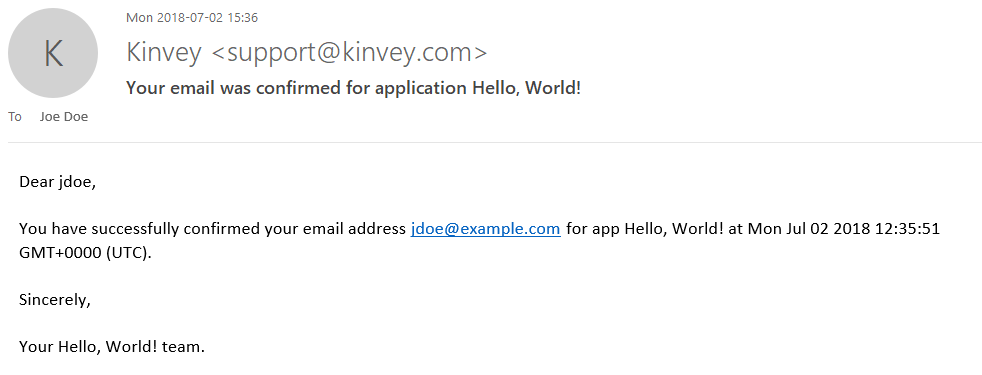
The workflow completes when the user opens and clicks on the link in the email, thus confirming the ownership of the mailbox. A final email is then sent to the user letting them know that their email address was successfully confirmed.
You can check the status of the email verification for a user.
You can check if an email is verified for a particular user by calling the isEmailVerified method on the user. Please note that you have to refresh the active user first using user.me if you are directly obtaining the status after calling user.verifyEmail.
var verified = user.isEmailVerified();You can get the status of the email verification process by looking at the metadata of the user.
var status = user.metadata.emailVerification;The verification workflow exposes the following states for user status:
sent: an email was sent in response to a verification initiate requestresent: multiple emails were sent in response to verification initiate requestsdelivered: the email was successfully delivered to the user's mailbox (as reported by the remote server)bounce: an email previously sent was bounced back by the remote server and couldn't be delivereddeferred: the mail system ran into transient problems delivering the email and deferred further attemptsdropped: the mail system dropped the email because of errorsconfirmed: the user opened the email and clicked on the link enclosed in the email.
Each time the status changes, the time of change is recorded as lastStateChangeAt.
Customization of verification templates
Kinvey provides generic templates for the emails being sent and the web page being shown during the verification. If you want to, you can customize the templates' contents. You can have different text and graphics for each app and even for each app environment.
To customize the templates, take these steps:
- Open the Console.
- Navigate to Users > Collection Setting > Email Verification.
- Find the Customize Kinvey email verification section.
- Expand each template to edit it using HTML and Mustache templating.
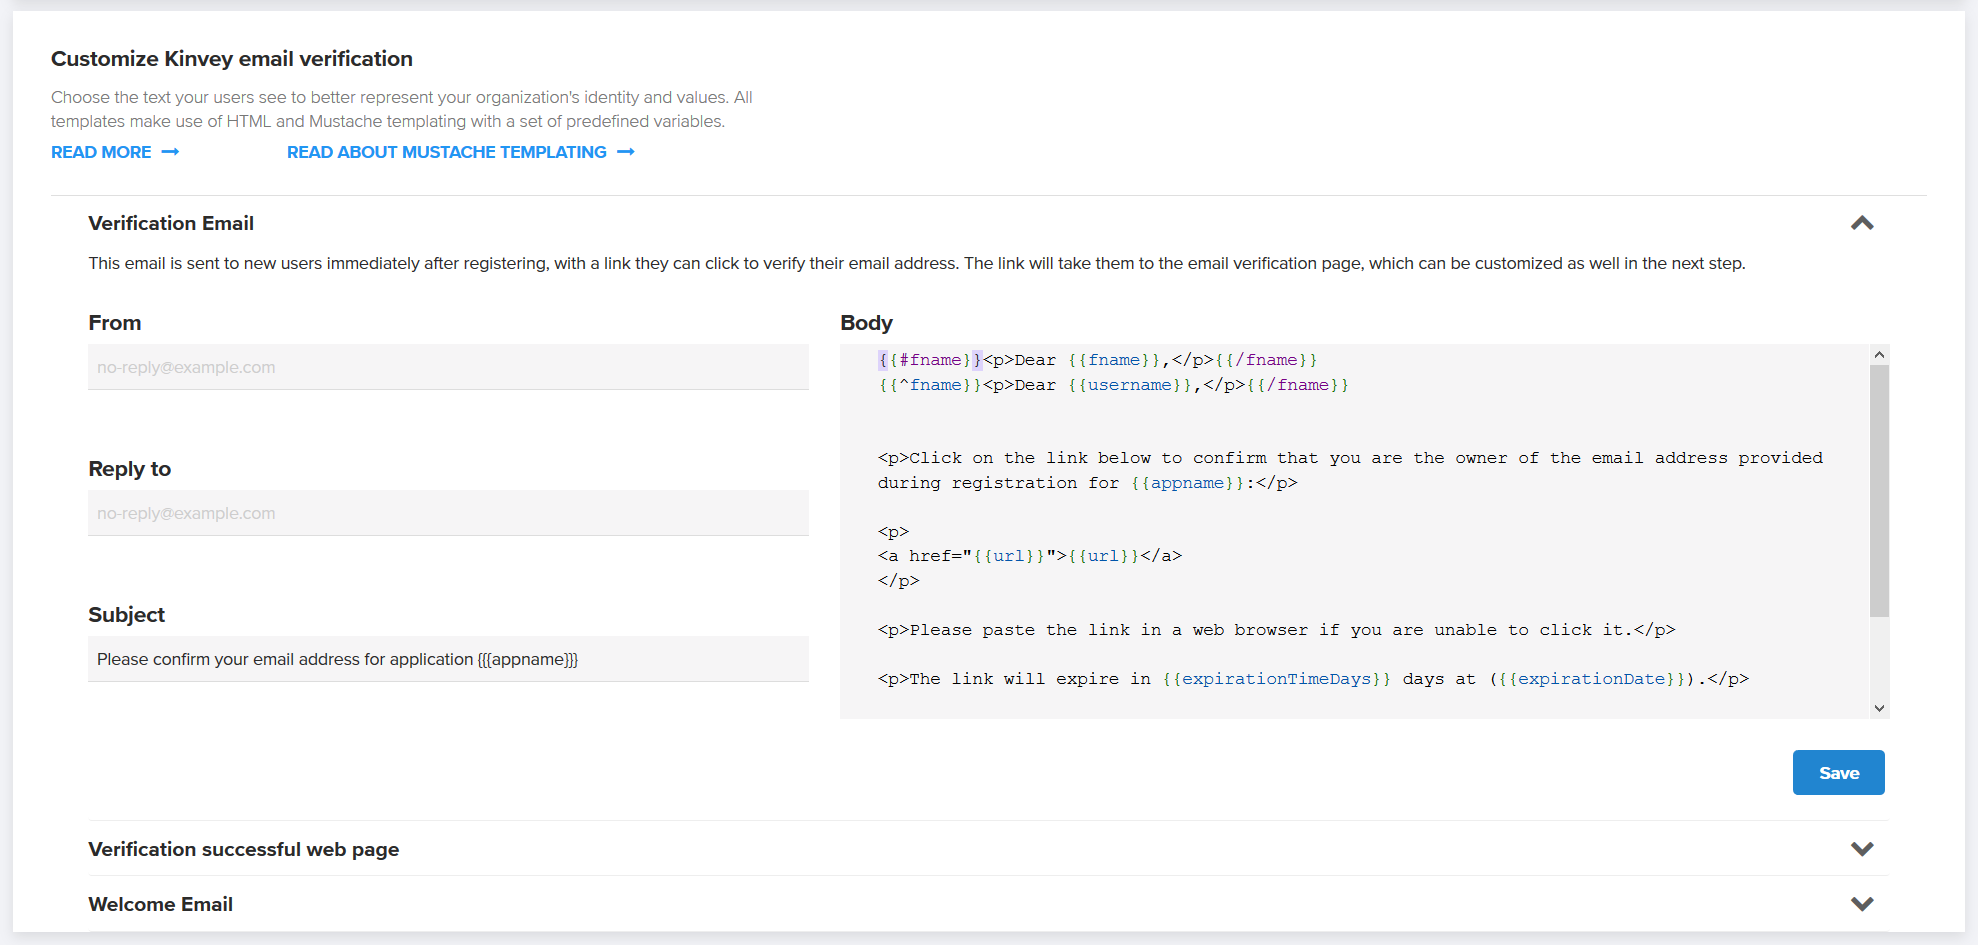
The From and Reply to fields found on the email templates can be in the form Display Name <account@example.com> or simply account@example.com.
The Subject and Body fields found on the email templates and the Body of the web page support variables. Variables are automatically replaced with appropriate values just before sending each copy of the email or showing each instance of the web page. Mustache templates are used to implement variables, which take the form of tags enclosed in double curly-brackets.
The available variables are predefined and vary by template type. You can't define additional variables.
Verification Email:
appname—application's namefname—user's first name, as specified by thefirst_namefield in the user collectionusername—user's username, as specified by theusernamefield in the user collectionurl—link that the user needs to click to verify the email and show the verification pageexpirationTimeDays—how many days the link is valid for (from generation time)expirationDate—exact date the link will expire
Welcome Email:
appname—application's namefname—user's first name, as specified by thefirst_namefield in the user collection.username—user's username, as specified by theusernamefield in the user collection.lastChangedAt—last time the user submitted a new password
Verification successful web page:
appname—application's namefname—user's first name, as specified by thefirst_namefield in the user collectionusername—user's username, as specified by theusernamefield in the user collectionlastChangedAt—last time the user submitted a new password
Mustache supports basic flow control through sections. In the following example, the contents of the section starting with {{#fname}} and ending with {{/fname}} will be shown if fname is defined. The second line utilizes an inverse section to show the username in case fname is empty.
{{#fname}}<p>Dear {{fname}},</p>{{/fname}}
{{^fname}}<p>Dear {{username}},</p>{{/fname}}
For advanced usage of sections, see the Mustache documentation.
Password Reset
Users can request that our system send them an email with a temporary password reset link. This link will open a web page where they can set a new password. The user must have a valid email set in the email attribute.
var promise = Kinvey.User.resetPassword('<username>')
  .then(function() {
    // ...
  })
  .catch(function(error) {
    // ...
  });
This request will send an email containing a secure time-bound link to the email address on record for the user. The link is served by Kinvey and is valid for twenty minutes from the time of the email. A link can be used for only one reset. Submitting the form will update the password for the user. The user will also receive a confirmation email when they complete the password reset.
Requesting a password reset will invalidate any active session tokens for the user and require a new login on any device using the app.
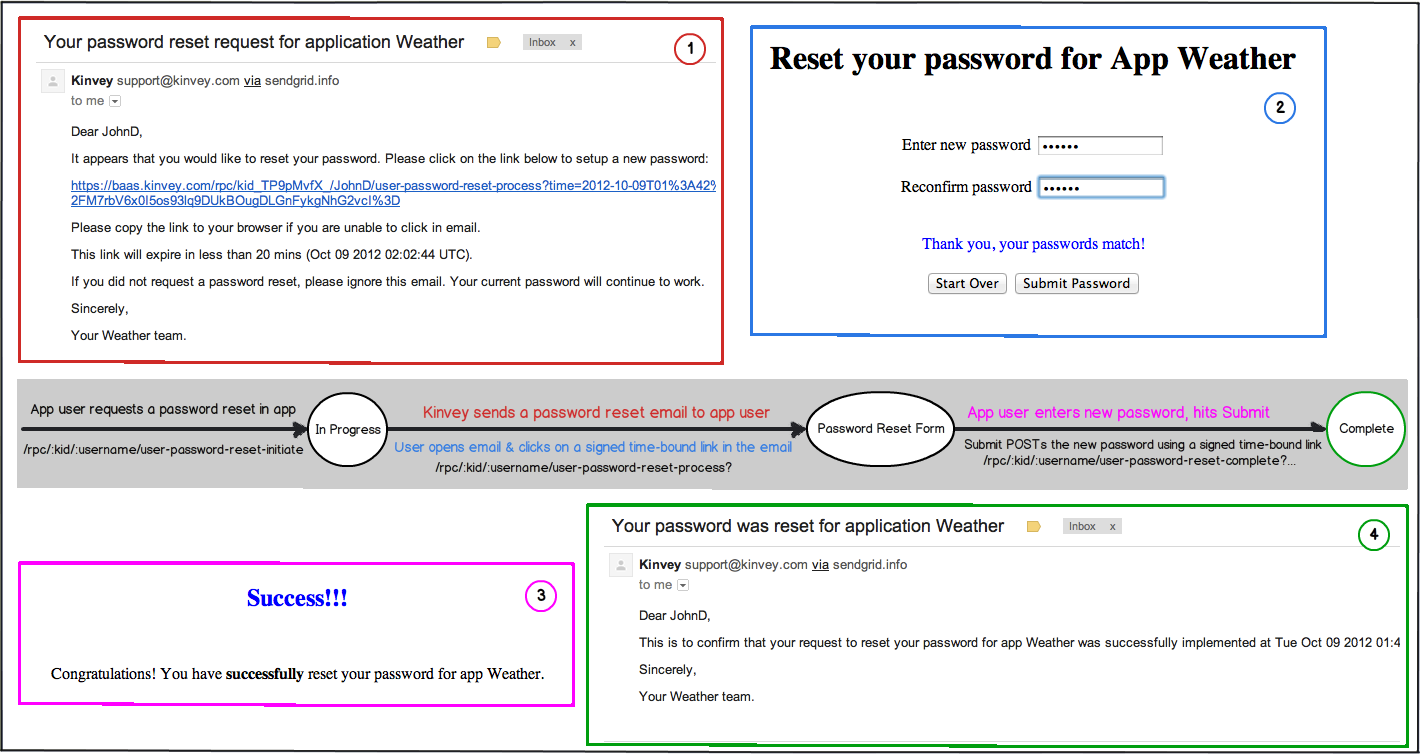
Until the password reset is complete, the old password remains active and valid. This allows the user to ignore the request if he remembers the old password. If too much time has passed, the email link will no longer be valid, and the user will have to initiate a new password reset.
Password Reset Email Customization
You have the option of customizing how the email is presented to your app users by specifying the from and reply-to email fields as well as the subjects and bodies of the first email and the congratulations email.
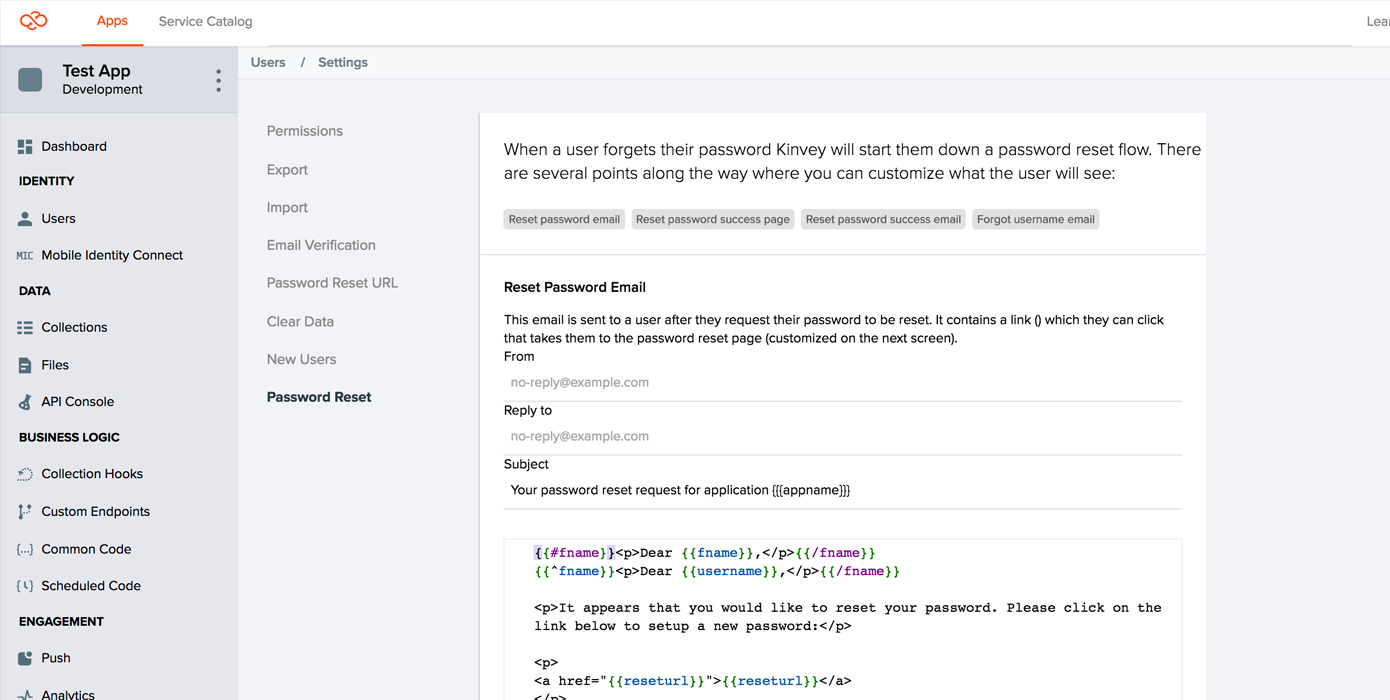
The From Address and Reply-To Address can be in the form: Display Name <account@server.com> or just account@server.com. Be aware that even if you change these fields will still be sent from support@kinvey.com, and this might cause the message to be flagged by some mail clients.
The Subject and Email fields support mustache templates (tags within double curly-brackets). The email field supports HTML bodies, but a plain-text version will be generated and sent along in the message as well.
The available tags vary by email type. The available tags are:
Reset Email:
appname- the application namefname- the user's first name, as specified by thefirst_namefield in the user collection.username- the user's username, as specified by theusernamefield in the user collection. The first two lines of the default template are a switch that uses first name if available, and username if one is not.reseturl- the link the user needs to click to go to the reset password pageexpirationTimeMins- how many minutes the link is valid for (from generation time)expirationDate- the exact date the link will expire
Congratulations Email:
appname- the application namefname- the user's first name, as specified by thefirst_namefield in the user collection.username- the user's username, as specified by theusernamefield in the user collection. The first two lines of the default template are a switch that uses first name if available, and username if one is not.lastChangedAt- the time the user submitted a new password
Using a Custom Password Reset Page
Rather than using the default password reset page hosted on Kinvey, you may optionally host a password reset page on your server. A link to this page will be included in the email sent to your app's users when they reset their password. Typically, you would select this option if you want your users to see a link pointing to your domain rather than to kinvey.com, and/or brand the page in any way you like to better fit your app's visual style.
Background and Process
In order to understand where your custom page fits in, it's helpful to understand the general password reset process:
A user attempts to reset their password. Your app makes a request to the password reset endpoint, either directly or via a client library.
Kinvey sends an email to the user, with a link to
baas.kinvey.com/rpc/:kid/:usernameOrEmail/user-password-reset-process(including parameters such astime,nonceandsig).When the user clicks the link, your app's password reset page is dynamically generated by Kinvey's servers and displayed to the user.
When the user submits the form on the password reset page, their browser requests
baas.kinvey.com/rpc/:kid/:usernameOrEmail/user-password-reset-complete(again, with some additional parameters), which resets their password, and displays a confirmation page.
The custom password reset page that you will host will essentially replace the third step described above. A link to your page will appear in the email sent to the user, and your page will then be responsible for parsing the required parameters from the email's link and passing them, along with the new password, onto the Kinvey endpoint mentioned in step 3.
Template
The first step in creating your custom password reset page is downloading our template:
The template contains a very simple password reset page that is modeled after our own. It contains a few lines of JavaScript code which parse the parameters from incoming URL, as well as a form allowing the user to input his new password. When the submit button is clicked, the form will send the required parameters to the Kinvey endpoint mentioned in step 3 above.
You are free to customize this form as you wish. Be aware that the Kinvey endpoint that completes the password reset process expects the data to be presented in a certain format, and you should be careful when modifying the JavaScript code or the form elements. After you have made your changes, always make sure that the newly modified page still works as expected by trying to reset a user's password through the Kinvey Console.
When you have finished customizing your password reset page, upload it to your server and make note of the URL. You will need to enter the page's URL in the next step.
Console Configuration
Once you have customized your page and uploaded it to your server, it is time to configure Kinvey so that it uses your page instead of the default one. To do so, open the Kinvey Console, navigate to the Users section, and open the Setting panel.
Select the Password Reset tab, and enter the URL for your custom page in the input field, and press the Save Changes button. This will complete the setup process, and your new page will now be used for all future password reset requests from your app.
It is highly recommended that you now test the password reset process in order to make sure that the changes you have made to the page are compatible.
Change Password
If the user is already logged in but wants to change the password, simply set a new password property on the user object and save the user.
var promise = new Kinvey.User.update({
  password: 'new-password'
})
  .then(function(user) {
    // ...
  })
  .catch(function(error) {
    // ...
  });
Forgot Username
If the user has forgotten the username to sign in, you can have Kinvey send an email with the username to the address set in the user's email field.
var promise = Kinvey.User.forgotUsername('<email>')
  .then(function() {
    // ...
  })
  .catch(function(error) {
    // ...
  });
Remove User Account
The remove operation allows you to completely delete a user account from the system as opposed to disable it.
The snippet below shows how to permanently remove a user account. Because the hard option is set to true, you will not be able to re-enable the user account after the deletion.
var promise = Kinvey.User.remove('<_id>', {
  hard: true
})
  .then(function() {
    // ...
  })
  .catch(function(error) {
    // ...
  });
Hard removal deletes the User collection entry and frees up the username for new registrations. Any other data related to the removed user, such as entities created in other collections or local data on client devices, is not deleted.
Disable User Account
You can disable, or soft-delete, the user account rather than remove it permanently. A disabled user account remains in place; only the user's ability to access the app is blocked.
A disabled user account's name remains reserved and cannot be used by new registrations.
To disable a user account, use the remove operation, but make sure the hard option is set to false.
var promise = Kinvey.User.remove('<_id>')
  .then(function() {
    // ...
  })
  .catch(function(error) {
    // ...
  });
Disabling can be initiated with user credentials, provided the appropriate permissions are set. A fitting example would be an administrator removing the account on user request or the user deleting their own account from the system.
You can view and reactivate disabled user accounts through the Kinvey Console.
Lock Down User Account
The app administrator has the ability to lock down a user account using the Kinvey Console. When a user account is in a locked-down state, any incoming request authenticated with the user's credentials or that attempts to log in the user will fail.
Functionally, lock down works identically to disable, but requires Master Secret authentication. In other words, lock down cannot be performed using user credentials and should never be done from your app for security reasons.
For users under lock down, the library will attempt to wipe all user data stored locally on the device where the app is running. This happens upon login and includes both permanent storage and memory.
Use the Kinvey Console to release users from lock-down.
Global User Administration
Username Existence Check
You can check whether a specific username already exists within your app.
var promise = Kinvey.User.exists('usernameToCheck')
  .then(function(exists) {
    // ...
  })
  .catch(function(error) {
    // ...
  });
Kinvey will respond with a boolean true if the username is already in use, or false if it is available for a new user.
User Discovery
Apps often need to share data between users or provide contact information of other users of the app. In such cases, user discovery is a way for your app to retrieve users from the user collection through a query.
It is not possible to fetch all users with an empty query using the 'lookup' method. You should use "query.equalTo" for the query when calling the lookup method. You can lookup users based on the following criteria:
usernamelast_namefirst_nameemail_socialidentity.facebook.id
var query = new Kinvey.Query();
query.equalTo('firstName', 'John');
var stream = Kinvey.User.lookup(query)
  .subscribe(function(users) {
    // ...
  });
Multi-factor authentication
You can use Multi-factor authentication (MFA) to provide a more secure login in your app. The feature is available as of version 6 of the Kinvey API. To use it in your app, you should use a SDK version 6.0.0 or above (for NativeScript - 7.0.0 or above) and use Kinvey.User.loginWithMFA() to log in users.
Kinvey supports time-based one-time password (TOTP) as a form of MFA. Each user can have one or more Kinvey authenticators - sources of second-factor authentication. This provides you with the opportunity to allow the users of your app to set up multiple devices. MFA is considered enabled for a certain user if they have at least one Kinvey authenticator. If you don't wish to support multiple authenticators, you can restrict the users in your app to having just one.
// check if MFA is already enabled for the active user
const isEnabled = await Kinvey.MFA.isEnabled();
Setup
Authenticator setup is a two-step process. First, Kinvey creates the authenticator and generates a secret, and then it verifies it. An authenticator app of choice uses the secret to generate a new authentication code after a certain amount of time (generally, 30 seconds). This code, along with username and password, is used to log in the user. It is also used to complete the Kinvey authenticator setup.
When MFA is enabled (i.e. the first Kinvey authenticator is created), recovery codes are generated and returned from the Kinvey API. It is wise to encourage the user to save them now, although they can be retrieved later as well.
The recovery codes can be used as a backup login method when the user has lost access to their device.
// setup MFA
const verify = async (authenticator, context) => {
    // provide the user with the authenticator secret (possibly, by showing a QR code) and get authentication code from them...
    return code;
};
const { authenticator, recoveryCodes } = await Kinvey.MFA.Authenticators.create({ name: 'workPhone' }, verify);
If the user enters a wrong code, the SDK will call verify again. The authenticator object will receive the created authenticator, which is eligible for verification. The secret to complete the process can be retrieved from authenticator.config.secret. The context object contains information about the number of retries so far and if any error has occurred.
Settings
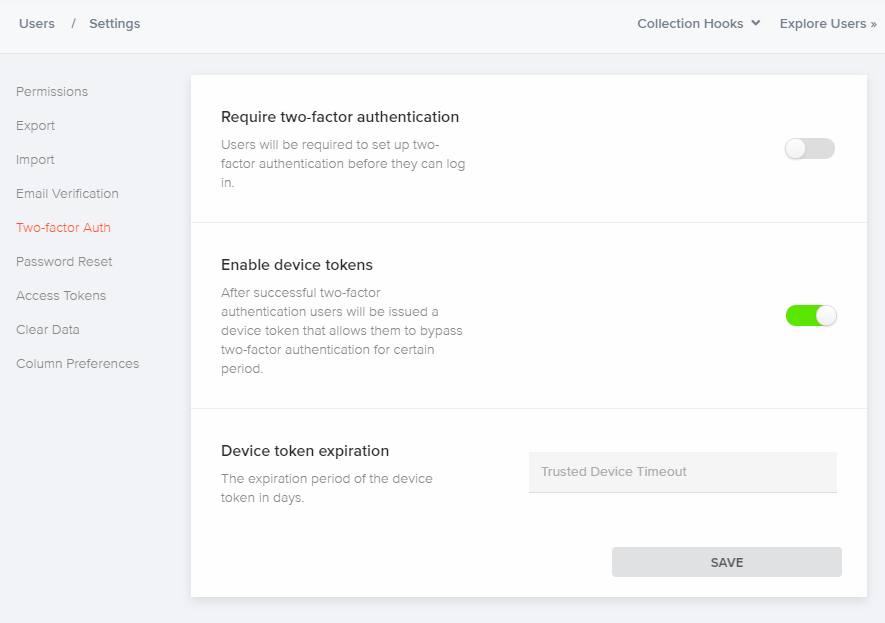
You can adjust specific MFA settings for your app in the Kinvey Console. Navigate to User settings to:
Require two-factor authentication - when enabled, users will be required to set up two-factor authentication before they can log in. Users who do not have the MFA set up, will have the chance to do it on the next login attempt.
Enable device tokens - after successful two-factor authentication, users will be issued a device token that allows them to bypass two-factor authentication for a certain period.
Device token expiration - set the expiration period of the device token in days.
Logging In
Use the loginWithMFA() method to log in users of your app. The method expects as arguments username, password, a function that 'knows' how to choose a Kinvey authenticator, a function that 'knows' how to get an authentication code from the user. You should call this method even if MFA is not required for your app (but it is supported). If the user has not enabled MFA and MFA is not required, the functions supplied to the loginWithMFA method will not be called. Logging in is a three-step process:
Get username and password from the user. This could be enough to log in when MFA is not required, and the user has no MFA setup, or when the user has decided to trust the device during a previous successful login.
Using the second factor to log in is needed, and you should get the user's choice of Kinvey authenticator. If you do not support multiple Kinvey authenticators, you should simply return the ID of the first authenticator from the
authenticatorslist. Note that if the user has no MFA setup but the app has enforced MFA, the SDK will stop the login flow by throwing an error. In this case, you could allow the user to do the MFA setup now and then initiate the login flow again.Get the authentication code from the user (e.g., the one, generated from the user's authenticator app). At this point, you could provide the user with the option to trust this device. If the user enters a wrong code, the SDK will call
mfaCompleteagain. Thecontextobject contains information about the number of retries so far and if any error has occurred.
const selectAuthenticator = async (authenticators, context) => {
  // choose an authenticator...
  return authenticatorId;
};
const mfaComplete = async (authenticator, context) => {
  // get authentication code from user...
  return {
    code: '',
    trustDevice: true|false
  }
};
const user = await Kinvey.User.loginWithMFA(username, password, selectAuthenticator, mfaComplete);
Login is now complete - the user context is cached on the device and subsequent uses of the app do not require another call to login.
An alternative method to loginWithMFA() is loginWithRecoveryCode(). You can use it when the user has lost access to their device or has some other issue preventing them from providing an authentication code.
const user = await Kinvey.User.loginWithRecoveryCode(username, password, recoveryCode);Management
You can provide your app users with the ability to manage their MFA setup - to add new authenticators, remove existing or disable MFA altogether.
To get the active user's authenticators:
const authenticators = await Kinvey.MFA.Authenticators.list();To remove an existing authenticator:
await Kinvey.MFA.Authenticators.remove(authenticatorId);Or to disable MFA:
await Kinvey.MFA.disable();Recovery codes can be retrieved at any time:
const recoveryCodes = await Kinvey.MFA.listRecoveryCodes();Or regenerated:
const recoveryCodes = await Kinvey.MFA.regenerateRecoveryCodes();Regeneration will invalidate previous codes.
You can also manage the users' MFA setup by using Master Secret authentication. The following methods of the User class can be used for this purpose:
await user.createAuthenticator(...)
await user.listAuthenticators(...)
await user.removeAuthenticator(...)
await user.listRecoveryCodes(...)
await user.regenerateRecoveryCodes(...)
await user.isMFAEnabled(...)
await user.disableMFA(...)
Keep in mind, though, that Master Secret should never be used in client-side code.
Login with Social Identities
You can use social identities to simplify user management in your app. By offering options for your users to login using their Facebook, Google+, or LinkedIn accounts, you eliminate a source of friction by not requiring that users create usernames and passwords just for your app.
Kinvey uses its Mobile Identity Connect (MIC) framework to connect to social identity providers (IdPs). This way, you have the benefit of using unified methods for connecting to all your IdPs—social, enterprise, and so on.
Service Settings
Before you can use MIC, you need to set up a RapidAuth service in the Kinvey Console for each IdP you want to connect to.
Facebook uses the Facebook Auth connector while Google and LinkedIn use the OAuth2 connector. Consult the following tables to learn how to quickly set up these RapidAuth connectors.
The Facebook Auth connector has the benefit of having all invariable connection and other settings set for you. For the rest of the settings, see Facebook Auth in the MIC guide.
| Setting | Value |
|---|---|
| Client ID | Facebook-provided ID |
| Client Secret | Facebook-provided secret |
| User ID Attribute | id |
| Redirect URI's | In case you are using a custom redirect URL (i.e., you are not using a Kinvey client SDK), whitelist it here |
| Scope | Specify the user attributes to request from the IdP |
Start an OAuth2 RadpidAuth connector and set it up as shown below. Note that depending on your use case, you may want to configure additional settings.
| Setting | Value |
|---|---|
| Provider URI | https://www.googleapis.com/oauth2/v4/token |
| Grant Type | Authorization Code |
| Grant Endpoint | https://accounts.google.com/o/oauth2/v2/auth |
| Client ID | Google-provided ID |
| Client Secret | Google-provided secret |
| User ID Attribute | id |
| User ID Endpoint | https://www.googleapis.com/oauth2/v1/userinfo |
| Redirect URI's | In case you are using a custom redirect URL (i.e., you are not using a Kinvey client SDK), whitelist it here |
| Scope | Specify the user attributes to request from the IdP |
Start an OAuth2 RadpidAuth connector and set it up as shown below. Note that depending on your use case, you may want to configure additional settings.
| Setting | Value |
|---|---|
| Provider URI | https://www.linkedin.com/uas/oauth2/accessToken |
| Grant Type | Authorization Code |
| Grant Endpoint | https://www.linkedin.com/uas/oauth2/authorization |
| Client ID | LinkedIn-provided ID |
| Client Secret | LinkedIn-provided secret |
| User ID Attribute | id |
| User ID Endpoint | https://api.linkedin.com/v1/people/~?format=json |
| Redirect URI's | In case you are using a custom redirect URL (i.e., you are not using a Kinvey client SDK), whitelist it here |
| Scope | Specify the user attributes to request from the IdP |
| Include client id in token request? | Yes |
| Include client secret in token request? | Yes |
IdP Settings
After setting up a service using the Kinvey Console, you need to set the IdP to work with Kinvey.
Set your Facebook app to allow a redirect URI used internally by Kinvey. Log in to your Facebook developer account, open the app, go to Facebook Login > Settings> Valid OAuth Redirect URIs, and enter the following URI:
https://auth.kinvey.com/facebook/redirecthttps://<instance>-auth.kinvey.comYou can find your Instance ID on the dashboard of the Kinvey Console, next to your App Key and App Secret.
Set your LinkedIn app to allow a redirect URI used internally by Kinvey. Log in to your LinkedIn developer account, open the app, find the OAuth 2.0 section and ensure that the Authorized Redirect URLs contains the following URL:
https://auth.kinvey.com/oauth2/redirecthttps://<instance>-auth.kinvey.comYou can find your Instance ID on the dashboard of the Kinvey Console, next to your App Key and App Secret.
Set your Google app to allow a redirect URI used internally by Kinvey. Log in to Google API Console and then:
- Open the Credentials page.
- Click Create credentials > OAuth client ID.
- For Application type, select Web application.
- In the Authorized redirect URIs text box that appears, enter the following URL:
https://auth.kinvey.com/oauth2/redirecthttps://<instance>-auth.kinvey.comYou can find your Instance ID on the dashboard of the Kinvey Console, next to your App Key and App Secret.
Logging In
Social login relies on MIC. If an existing Kinvey user is logged in to the app, MIC updates the user account with the passed social identity information. If not, it looks for an existing Kinvey user that shares the same OAuth access token and logs them in. Finally, if such a user does not exist, MIC creates a new user account and associates the social identity with it.
Go to the Mobile Identity Connect guide to learn how to log in with MIC.
Authorization
Controlling user access to your app's resources is achieved through collection- and entity-level permissions, which rely on roles. To learn more about setting permissions, head to the Security guide. Role management is described in Roles.