 Docs
Docs
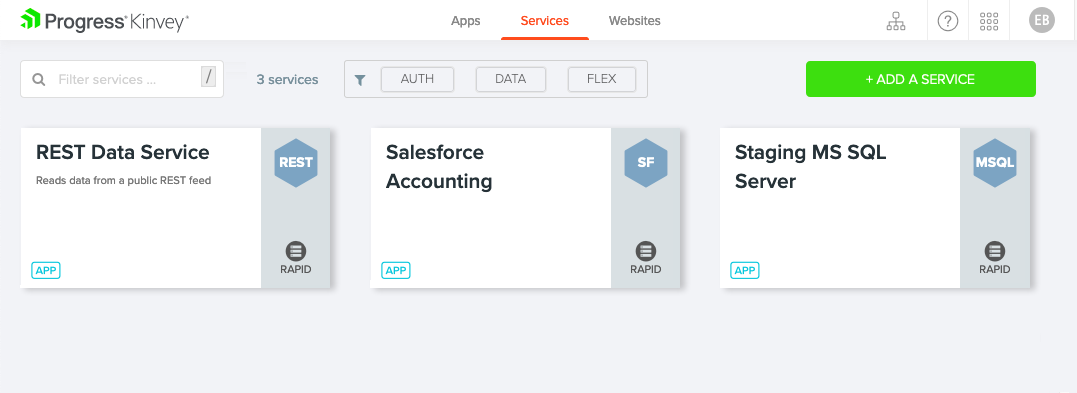
RapidData
What is RapidData?
A common problem among BaaS customers is how to expose their enterprise applications to mobile use cases, and do so without developing and deploying complex APIs. Kinvey RapidData is a feature that makes your enterprise applications mobile-ready by connecting them to Kinvey without needing any code.
Connector for RapidHealth
RapidHealth allows you to access various health data APIs.
Complete these steps to create a RapidHealth connector:
Go to Service Catalog > Add a service > RapidData and select RapidHealth.
Complete the form and then click Save.
- Name—Arbitrary name that will let you recognize the connector (for example, myRapidHealthService). Note that duplicate names are allowed between connectors.
- Description—Optional description.
Scope/App—App or organization from your Kinvey account to use the service.
At this point, you will have a service created. The Console will start a new service environment for you, which is required for the service to be usable.
In the Connection Options tab of the service environment, set the following options:
- Username—Your RapidHealth Client ID.
Password—Your RapidHealth Client Secret.
To obtain a RapidHealth Client ID and Client Secret, contact Kinvey Support.
Click Save to create the service environment and complete the service.
Creating Service Objects
To allow access to specific data in your system, you need to create a service object. A service object is a generic term for data objects or records on a remote system that Kinvey can interact with—in this case, a RapidHealth endpoint.
To create a service object, go to the Service Catalog, click your service, switch the service environment if needed, and select the Service Objects tab in the left-hand pane.
You can create service objects manually, but RapidData comes with a convenient auto-discovery tool you can use. Select the Discover option and then click the eponymous button to make Kinvey query all available service objects. From the results, select the service object that you want to expose and configure it.
The following example screen shows an endpoint called "Providers".
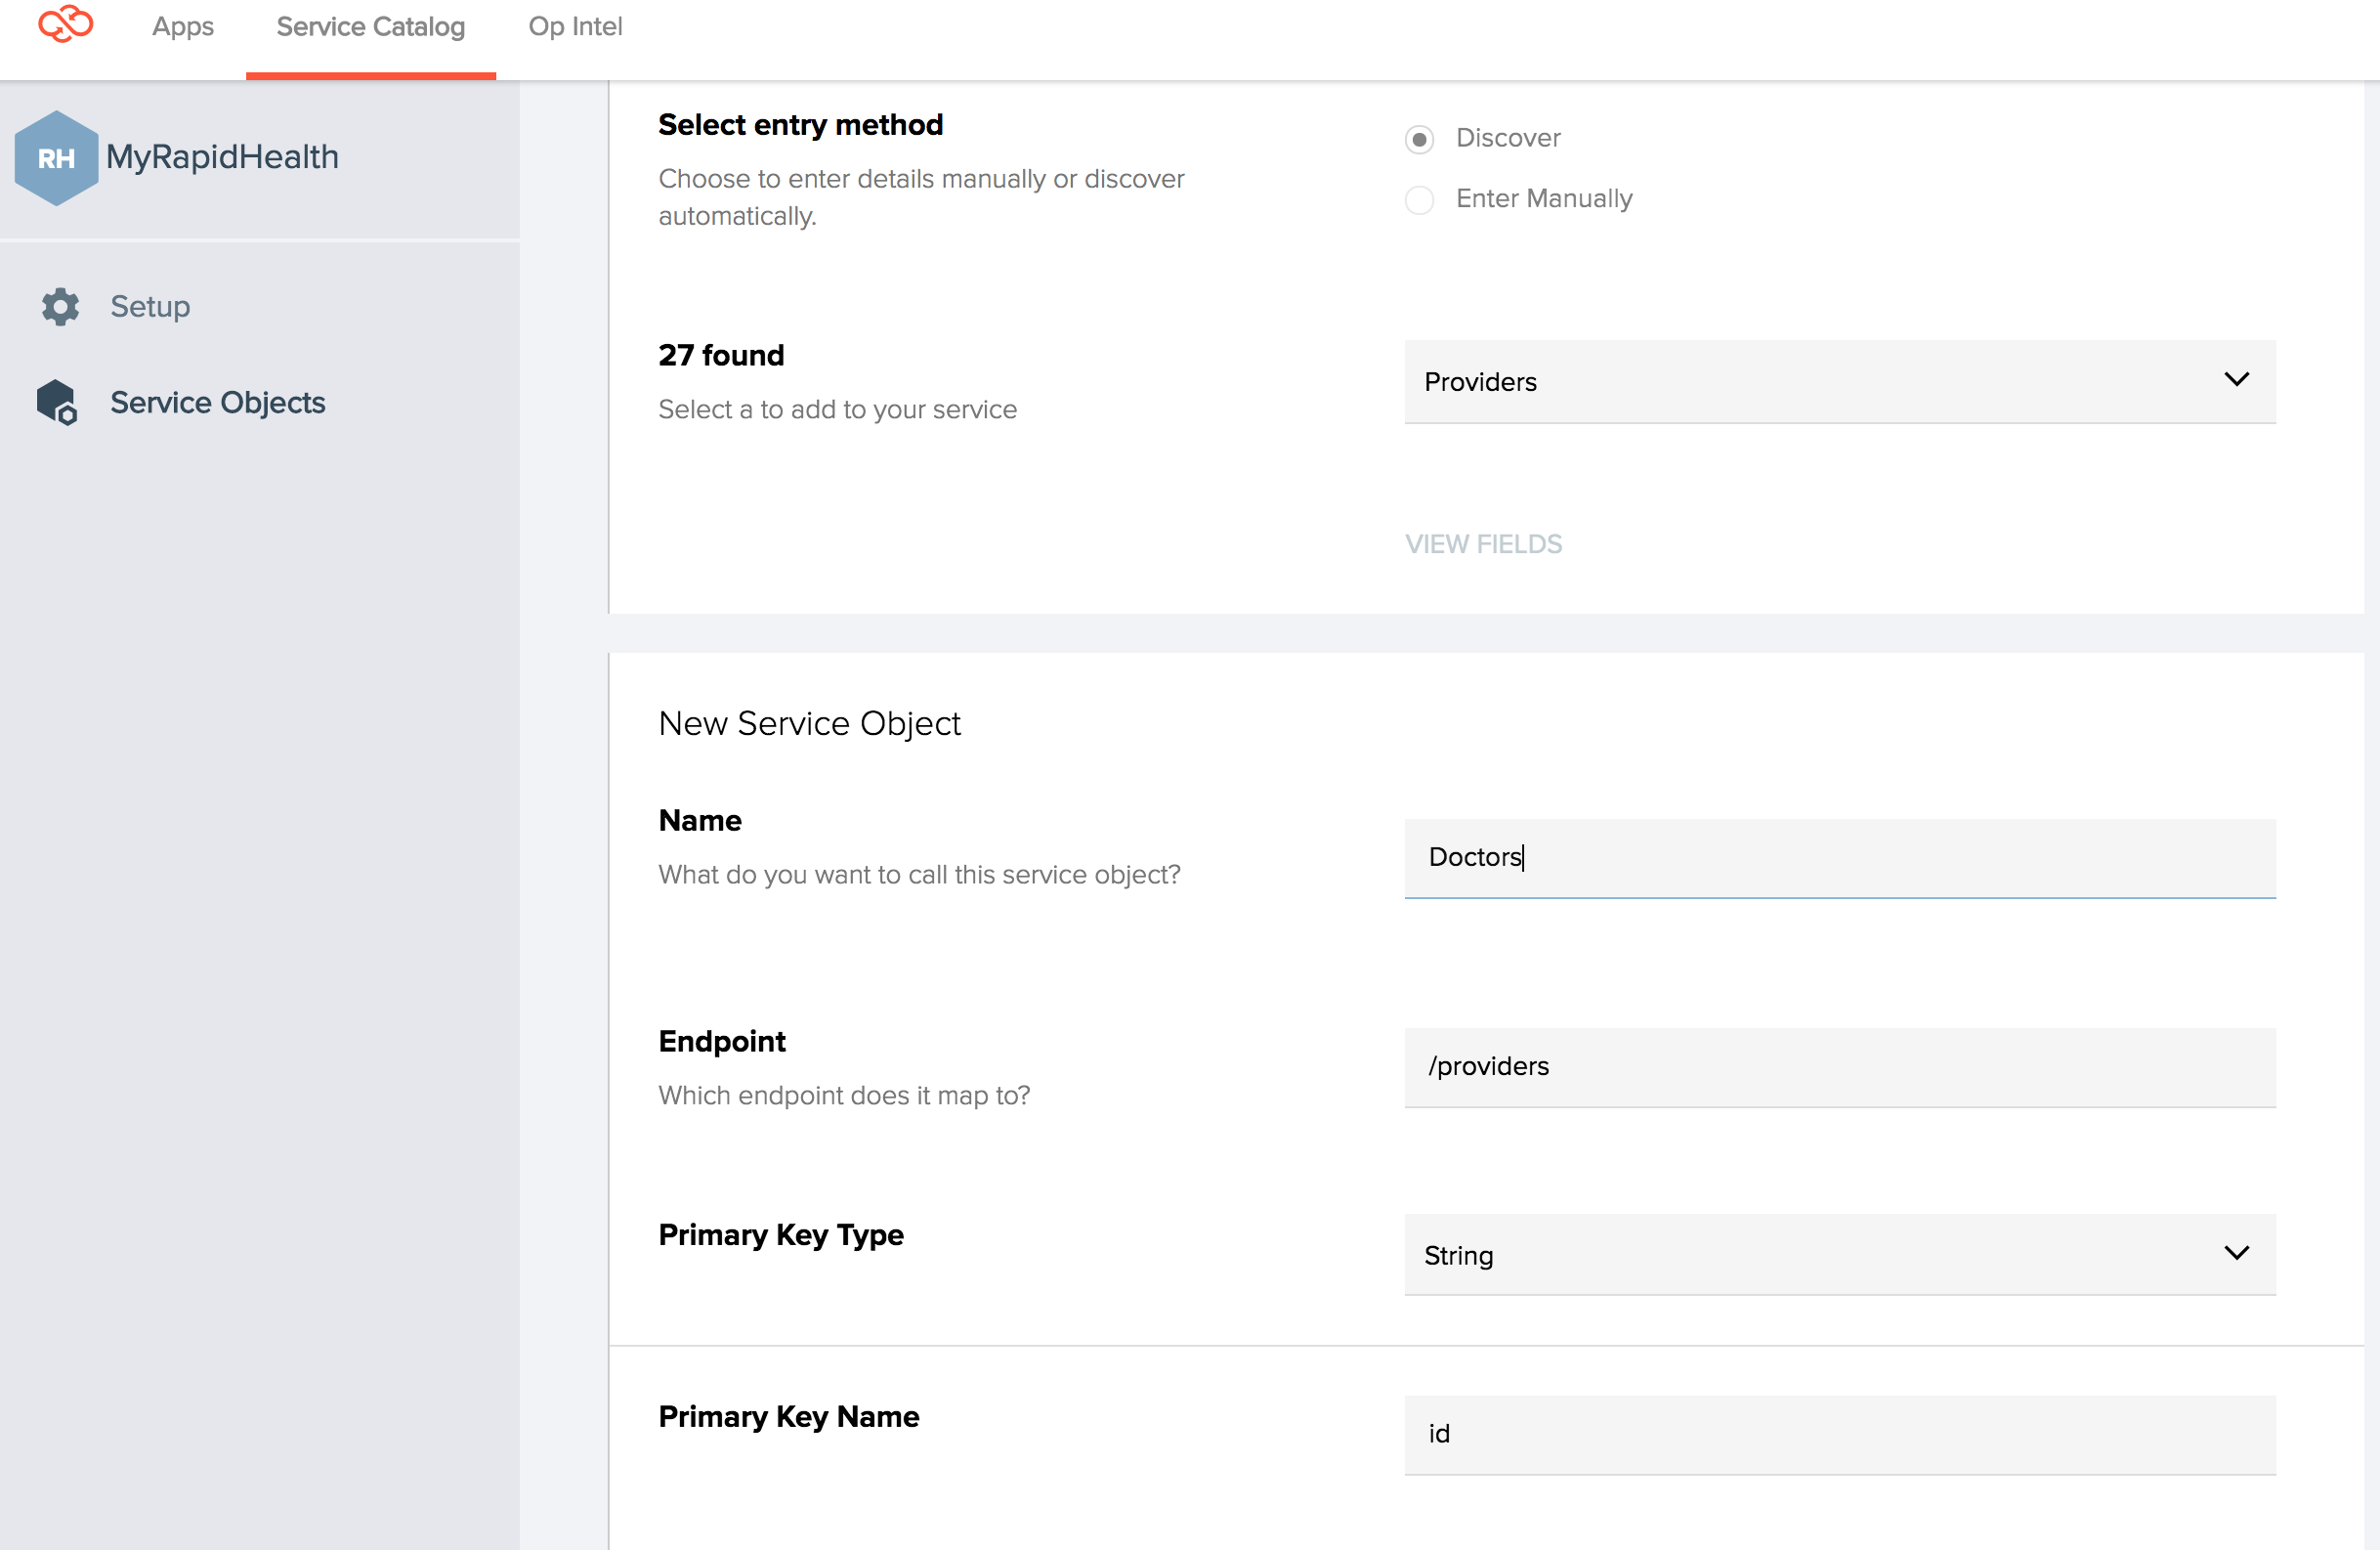
- In the Name text box, provide a name for the service object. This name is used by your mobile developer to reference the endpoint within Kinvey. You can make the name match the endpoint name, or provide a more user-friendly name. In the example above, the endpoint is "Providers", but the service object name is "Doctors".
- Endpoint is automatically populated based on your choice.
- In Primary Key Type, select the type of the property that uniquely identifies the resource: number (int) or string.
- In Primary Key Name, enter the name of the property that uniquely identifies the resource.
Switching a toggle under Supported Operations enables the respective operation.
Any request sent to Kinvey for a operation not enabled here receives the
405 METHOD NOT ALLOWEDerror.If you want a read-only access to your system, only enable the
getoperations. EnablinggetByQuerymakes it possible for your mobile developers to submit queries using the Kinvey native mobile libraries.
Under Field Mapping, you can control the fields exposed.
Click ADD FIELD MAPPING to start defining mappings. You can click ADD ALL to create automatic mappings for all fields with the ability to remove the ones you don't need, or you can add field mappings one by one. Click REDISCOVER FIELDS if you don't see the ADD ALL button.
It is strongly recommended to map the source's primary key to the Kinvey_idfield. Specifying the primary key is required by Kinvey features like Offline and Caching (using the Cache and Sync data store types) and Cloud Caching.Nested fields are supported. To map a nested field, use a dot notation, e.g.
name.firstname. Note that if your system has nested fields, the discovery feature only detects the top level, but you can add the mapping manually. For example,location.citycan map toCityon the Kinvey side. There is no limit on the nesting depth.
Finally, click Save service object to create your service object and make it ready for accessing.
Accessing Service Objects
To make a service object accessible from a mobile application, you need to map it to a collection first.
Follow these steps to create a collection mapped to a service object:
- In the Kinvey Console, go to the app that will be consuming the service object and select an environment.
- From the menu on the left, select Collections > Add a Collection.
When entering a name for the collection, use the exact same name as the service object name.
The matched name serves as a mapping between the collection and the service object.
After the collection is created, go to Data Source in the collection menu and select Use a Data Service.
- Select the RapidData service and the service environment that you want to use.
- Select the Service Object that you want to map the collection to.
- Click CONFIRM.
You need to create and map a separate collection for each service object you exposed.
To verify that you can reach the data in the service object, make a request to the mapped Kinvey collection using the API Console (DATA > API Console in the left-hand navigation). Complete the URL box with the name of your collection and click Send to see a data panel below appear with your data in it. If updates or deletes are allowed, select the appropriate verb and pass the right request body if needed.
Connector for ProgressData
The RapidData connector for ProgressData allows you to connect Kinvey to any public OpenEdge Data Object Service defined in a JSDO service catalog. To learn more about Progress OpenEdge Data Object Services, see the OpenEdge documentation.
Complete these steps to create a Progress Data connector:
Go to Service Catalog > Add a service > RapidData and select ProgressData.
Complete the form and then click Save.
- Name—Arbitrary name that will let you recognize the connector (for example, myProgressDataService). Note that duplicate names are allowed between connectors.
- Description—Optional description.
Scope/App—App or organization from your Kinvey account to use the service.
At this point, you will have a service created. The Console will start a new service environment for you, which is required for the service to be usable.
In the Connection Options tab of the service environment, set the following options:
- Service URI—Base URL of the OpenEdge Data Object Service (for example, http://oemobiledemo.progress.com/OEMobileDemoServices).
- Catalog URI—The JSDO catalog URL that contains the definition of the OpenEdge Data Object Services (for example, http://oemobiledemo.progress.com/OEMobileDemoServices/static/CustomerService.json).
Authenticate via—Authentication mechanism to the OpenEdge Data Object service.
- Mobile Identity Connect (MIC)—Indicates that you want to utilize a MIC setup that you created earlier.
- Basic—Credentials (username and password) are passed as a base64-encoded value in the Authorization header.
- None—Indicates that no authentication is required.
Basic Authentication Options Description Username Username to be passed as base64-encoded string in the Authorizationheader.Password Password to be passed as base64-encoded string in the Authorizationheader.
Click Save to create the service environment and complete the service.
Creating Service Objects
To allow access to specific data in your system, you need to create a service object. A service object is a generic term for data objects or records on a remote system that Kinvey can interact with—in this case, a Progress OpenEdge Data Object service.
To create a service object, go to the Service Catalog, click your service, switch the service environment if needed, and select the Service Objects tab in the left-hand pane.
You can create service objects manually, but RapidData comes with a convenient auto-discovery tool you can use. Select the Discover option and then click the eponymous button to make Kinvey query all available service objects. From the results, select the service object that you want to expose and configure it.
The following example screen shows a resource called "Customer".
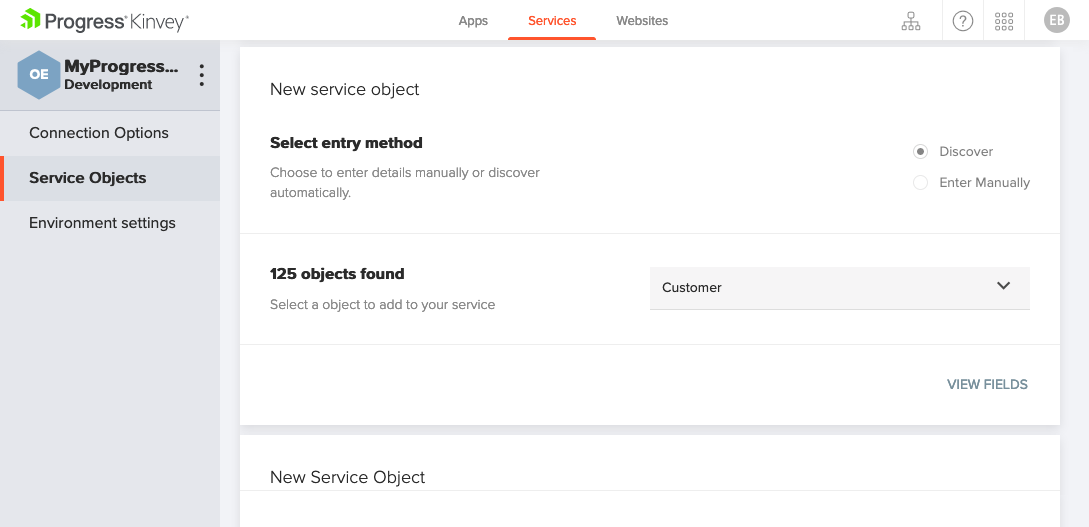
- In the Name text box, provide a name for the service object. This name is used by your mobile developer to reference the endpoint within Kinvey. You can make the name match the endpoint name, or provide a more user-friendly name.
- In the Resource Name text box, specify the name of the resource as defined in the JSDO catalog.
- In Primary Key Name, enter the name of the property that uniquely identifies the resource.
- In the Supported Operations section, enable all operations.
Finally, click Save service object to create your service object and make it ready for accessing.
Accessing Service Objects
To make a service object accessible from a mobile application, you need to map it to a collection first.
Follow these steps to create a collection mapped to a service object:
- In the Kinvey Console, go to the app that will be consuming the service object and select an environment.
- From the menu on the left, select Collections > Add a Collection.
When entering a name for the collection, use the exact same name as the service object name.
The matched name serves as a mapping between the collection and the service object.
After the collection is created, go to Data Source in the collection menu and select Use a Data Service.
- Select the RapidData service and the service environment that you want to use.
- Select the Service Object that you want to map the collection to.
- Click CONFIRM.
You need to create and map a separate collection for each service object you exposed.
To verify that you can reach the data in the service object, make a request to the mapped Kinvey collection using the API Console (DATA > API Console in the left-hand navigation). Complete the URL box with the name of your collection and click Send to see a data panel below appear with your data in it. If updates or deletes are allowed, select the appropriate verb and pass the right request body if needed.
Connector for DataDirect
The RapidData connector for DataDirect allows you to connect Kinvey to any datastore to which you have a data source already configured in DataDirect.
Complete these steps to create a DataDirect connector:
Go to Service Catalog > Add a service > RapidData and select DataDirect Hybrid Data Pipeline.
Complete the form and then click Save.
- Name—Arbitrary name that will let you recognize the connector (for example, myDataDirectService). Note that duplicate names are allowed between connectors.
- Description—Optional description.
Scope/App—App or organization from your Kinvey account to use the service.
At this point, you will have a service created. The Console will start a new service environment for you, which is required for the service to be usable.
In the Connection Options tab of the service environment, set the following options:
- Username—Your DataDirect username.
- Password—Your DataDirect password.
Click Save to create the service environment and complete the service.
Creating Service Objects
To allow access to specific data in your system, you need to create a service object. A service object is a generic term for data objects or records on a remote system that Kinvey can interact with—in this case, a DataDirect data source.
To create a service object, go to the Service Catalog, click your service, switch the service environment if needed, and select the Service Objects tab in the left-hand pane.

- In the Name text box, provide a name for the service object. This name is used by your mobile developer to reference the endpoint within Kinvey. You can make the name match the endpoint name, or provide a more user-friendly name. In the example above, the endpoint is "Employees", but the service object name is "people".
- Endpoint is in the format
/<datasourceName>/<entityInstance>. - In Primary Key Type, select the type of the property that uniquely identifies the resource: number (int) or string.
- In Primary Key Name, enter the name of the property that uniquely identifies the resource.
Switching a toggle under Supported Operations enables the respective operation.
Any request sent to Kinvey for a operation not enabled here receives the
405 METHOD NOT ALLOWEDerror.If you want a read-only access to your system, only enable the
getoperations. EnablinggetByQuerymakes it possible for your mobile developers to submit queries using the Kinvey native mobile libraries.
Under Field Mapping, you can control the fields exposed.
Click ADD FIELD MAPPING to start defining mappings. You can click ADD ALL to create automatic mappings for all fields with the ability to remove the ones you don't need, or you can add field mappings one by one. Click REDISCOVER FIELDS if you don't see the ADD ALL button.
It is strongly recommended to map the source's primary key to the Kinvey_idfield. Specifying the primary key is required by Kinvey features like Offline and Caching (using the Cache and Sync data store types) and Cloud Caching.Nested fields are supported. To map a nested field, use a dot notation, e.g.
name.firstname. Note that if your system has nested fields, the discovery feature only detects the top level, but you can add the mapping manually. For example,location.citycan map toCityon the Kinvey side. There is no limit on the nesting depth.
Finally, click Save service object to create your service object and make it ready for accessing.
Accessing Service Objects
To make a service object accessible from a mobile application, you need to map it to a collection first.
Follow these steps to create a collection mapped to a service object:
- In the Kinvey Console, go to the app that will be consuming the service object and select an environment.
- From the menu on the left, select Collections > Add a Collection.
When entering a name for the collection, use the exact same name as the service object name.
The matched name serves as a mapping between the collection and the service object.
After the collection is created, go to Data Source in the collection menu and select Use a Data Service.
- Select the RapidData service and the service environment that you want to use.
- Select the Service Object that you want to map the collection to.
- Click CONFIRM.
You need to create and map a separate collection for each service object you exposed.
To verify that you can reach the data in the service object, make a request to the mapped Kinvey collection using the API Console (DATA > API Console in the left-hand navigation). Complete the URL box with the name of your collection and click Send to see a data panel below appear with your data in it. If updates or deletes are allowed, select the appropriate verb and pass the right request body if needed.
Connector for SharePoint
Complete these steps to create a Microsoft SharePoint connector:
Go to Service Catalog > Add a service > RapidData and select Sharepoint.
Complete the form and then click Save.
- Name—Arbitrary name that will let you recognize the connector (for example, mysharepoint). Note that duplicate names are allowed between connectors.
- Description—Optional description.
Scope/App—App or organization from your Kinvey account to use the service.
At this point, you will have a service created. The Console will start a new service environment for you, which is required for the service to be usable.
In the Connection Options tab of the service environment, set the following options:
- Version—Microsoft SharePoint version you are connecting to. Note that if your instance is hosted on-premises and is inaccessible from the Internet, you need to utilize our Secure Gateway to provide access to your on-premises systems. Contact Sales if you would like to learn more.
- Host—SharePoint instance hostname.
- Site—SharePoint site name to use (for example,
MySubSite). Leave blank to utilize the default site. - Encryption—Whether your SharePoint instance requires an encrypted TLS connection.
- Authenticate via—Authentication mechanism to the SharePoint instance.
- Mobile Identity Connect (MIC)—Indicates that you want to utilize a MIC setup that you created earlier.
- Service Account—Indicates that you want to utilize a SharePoint service account.
- Username—Service account username (only when you have selected
Authenticate via:Service Account). - Password—Service account password (only when you have selected
Authenticate via:Service Account).
Click Save to create the service environment and complete the service.
Creating Service Objects
To allow access to specific data in your system, you need to create a service object. A service object is a generic term for data objects or records on a remote system that Kinvey can interact with—in this case, a SharePoint list.
To create a service object, go to the Service Catalog, click your service, switch the service environment if needed, and select the Service Objects tab in the left-hand pane.
RapidData for SharePoint allows you to work with SharePoint Lists. Support for other objects, such as Files, is on the roadmap.
You can create service objects manually, but RapidData comes with a convenient auto-discovery tool you can use. Select the Discover option and then click the eponymous button to make Kinvey query all available service objects. From the results, select the service object that you want to expose and configure it.
The following example screen shows a List called "Books".
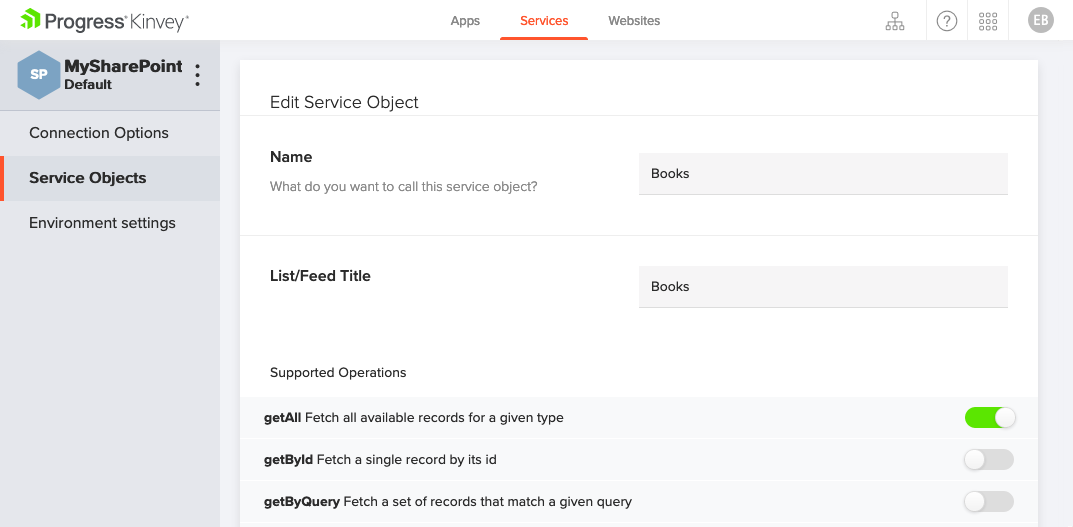
- In the Name text box, provide a name for the service object. This name is used by your mobile developer to reference the SharePoint list within Kinvey. You can make the name match the list name, or provide a more user-friendly name.
Switching a toggle under Supported Operations enables the respective operation.
Any request sent to Kinvey for a operation not enabled here receives the
405 METHOD NOT ALLOWEDerror.If you want a read-only access to your system, only enable the
getoperations. EnablinggetByQuerymakes it possible for your mobile developers to submit queries using the Kinvey native mobile libraries.
Under Field Mapping, you can control the fields exposed.
Click ADD FIELD MAPPING to start defining mappings. You can click ADD ALL to create automatic mappings for all fields with the ability to remove the ones you don't need, or you can add field mappings one by one. Click REDISCOVER FIELDS if you don't see the ADD ALL button.
It is strongly recommended to map the source's primary key to the Kinvey_idfield. Specifying the primary key is required by Kinvey features like Offline and Caching (using the Cache and Sync data store types) and Cloud Caching.Nested fields are supported. To map a nested field, use a dot notation, e.g.
name.firstname. Note that if your system has nested fields, the discovery feature only detects the top level, but you can add the mapping manually. For example,location.citycan map toCityon the Kinvey side. There is no limit on the nesting depth.
Finally, click Save service object to create your service object and make it ready for accessing.
Accessing Service Objects
To make a service object accessible from a mobile application, you need to map it to a collection first.
Follow these steps to create a collection mapped to a service object:
- In the Kinvey Console, go to the app that will be consuming the service object and select an environment.
- From the menu on the left, select Collections > Add a Collection.
When entering a name for the collection, use the exact same name as the service object name.
The matched name serves as a mapping between the collection and the service object.
After the collection is created, go to Data Source in the collection menu and select Use a Data Service.
- Select the RapidData service and the service environment that you want to use.
- Select the Service Object that you want to map the collection to.
- Click CONFIRM.
You need to create and map a separate collection for each service object you exposed.
To verify that you can reach the data in the service object, make a request to the mapped Kinvey collection using the API Console (DATA > API Console in the left-hand navigation). Complete the URL box with the name of your collection and click Send to see a data panel below appear with your data in it. If updates or deletes are allowed, select the appropriate verb and pass the right request body if needed.
Connector for Microsoft SQL Server
Complete these steps to create a Microsoft SQL Server connector:
Go to Service Catalog > Add a service > RapidData and select Microsoft SQL Server.
Complete the form and then click Save.
- Name—Arbitrary name that will let you recognize the connector (for example, mysqlserver). Note that duplicate names are allowed between connectors.
- Description—Optional description.
Scope/App—App or organization from your Kinvey account to use the service.
At this point, you will have a service created. The Console will start a new service environment for you, which is required for the service to be usable.
In the Connection Options tab of the service environment, set the following options:
- SQL Server Version—Microsoft SQL Server version you are connecting to. Note that if your instance is hosted on-premises and is inaccessible from the Internet, you need to utilize our Secure Gateway to provide access to your on-premises systems. Contact Sales if you would like to learn more.
- Host—SQL Server instance hostname in the format
mssql://<hostname or IP address>. - Database—SQL Server database name to use.
- Encryption—Whether your SharePoint instance requires an encrypted TLS connection.
- Authenticate via—Authentication mechanism to the SharePoint instance.
- Service Account—Indicates that you want to utilize SQL Server Authentication in Mixed Mode.
- Windows Service Account—Indicates that you want to utilize SQL Server Windows Authentication.
- Username—SQL Server username when you have selected
Authenticate via:Service Accountor Windows username when you have selectedAuthenticate via:Windows Service Account. - Password—SQL Server password when you have selected
Authenticate via:Service Accountor Windows password when you have selectedAuthenticate via:Windows Service Account. - Domain—Windows domain for when you have selected
Authenticate via:Windows Service Account.
Click Save to create the service environment and complete the service.
Creating Service Objects
To allow access to specific data in your system, you need to create a service object. A service object is a generic term for data objects or records on a remote system that Kinvey can interact with—in this case, an SQL table or view.
To create a service object, go to the Service Catalog, click your service, switch the service environment if needed, and select the Service Objects tab in the left-hand pane.
You can create service objects manually, but RapidData comes with a convenient auto-discovery tool you can use. Select the Discover option and then click the eponymous button to make Kinvey query all available service objects. From the results, select the service object that you want to expose and configure it.
The following example screen shows a table called "people".
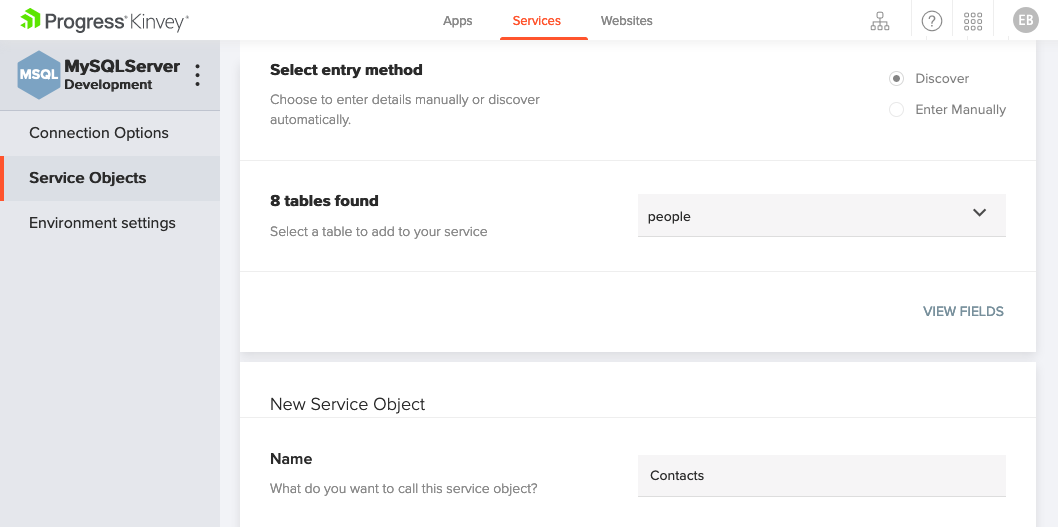
- In the Name text box, provide a name for the service object. This name is used by your mobile developer to reference the SQL Object within Kinvey. You can make the name match the table or view name, or provide a more user-friendly name. In the example above, the table is "people", but the service object name is "Contacts".
- In Primary Key Name, enter the name of the property that uniquely identifies the resource.
- In Primary Key Type, enter the type of the property that uniquely identifies the resource.
Switching a toggle under Supported Operations enables the respective operation.
Any request sent to Kinvey for a operation not enabled here receives the
405 METHOD NOT ALLOWEDerror.If you want a read-only access to your system, only enable the
getoperations. EnablinggetByQuerymakes it possible for your mobile developers to submit queries using the Kinvey native mobile libraries.
Under Field Mapping, you can control the fields exposed.
Click ADD FIELD MAPPING to start defining mappings. You can click ADD ALL to create automatic mappings for all fields with the ability to remove the ones you don't need, or you can add field mappings one by one. Click REDISCOVER FIELDS if you don't see the ADD ALL button.
It is strongly recommended to map the source's primary key to the Kinvey_idfield. Specifying the primary key is required by Kinvey features like Offline and Caching (using the Cache and Sync data store types) and Cloud Caching.Nested fields are supported. To map a nested field, use a dot notation, e.g.
name.firstname. Note that if your system has nested fields, the discovery feature only detects the top level, but you can add the mapping manually. For example,location.citycan map toCityon the Kinvey side. There is no limit on the nesting depth.
Finally, click Save service object to create your service object and make it ready for accessing.
Accessing Service Objects
To make a service object accessible from a mobile application, you need to map it to a collection first.
Follow these steps to create a collection mapped to a service object:
- In the Kinvey Console, go to the app that will be consuming the service object and select an environment.
- From the menu on the left, select Collections > Add a Collection.
When entering a name for the collection, use the exact same name as the service object name.
The matched name serves as a mapping between the collection and the service object.
After the collection is created, go to Data Source in the collection menu and select Use a Data Service.
- Select the RapidData service and the service environment that you want to use.
- Select the Service Object that you want to map the collection to.
- Click CONFIRM.
You need to create and map a separate collection for each service object you exposed.
To verify that you can reach the data in the service object, make a request to the mapped Kinvey collection using the API Console (DATA > API Console in the left-hand navigation). Complete the URL box with the name of your collection and click Send to see a data panel below appear with your data in it. If updates or deletes are allowed, select the appropriate verb and pass the right request body if needed.
Connector for Salesforce
Complete these steps to create a Salesforce connector:
Go to Service Catalog > Add a service > RapidData and select Salesforce.
Complete the form and then click Save.
- Name—Arbitrary name that will let you recognize the connector (for example, mySalesforce). Note that duplicate names are allowed between connectors.
- Description—Optional description.
Scope/App—App or organization from your Kinvey account to use the service.
At this point, you will have a service created. The Console will start a new service environment for you, which is required for the service to be usable.
In the Connection Options tab of the service environment, set the following options:
- Host—Salesforce instance hostname, usually
login.salesforce.comfor cloud-based solutions. - Authenticate via—Authentication mechanism to the Salesforce instance.
- Mobile Identity Connect (MIC)—Indicates that you want to utilize a MIC setup that you created earlier.
- Service Account—Indicates that you want to utilize a Salesforce service account.
- Service Account OAuth—Indicates that you want to utilize the Salesforce OAuth authentication flow.
- Username—The username of your Salesforce account (only when you have selected
Authenticate via:Service AccountorService Account OAuth). - Password—The password of a Salesforce account (only when you have selected
Authenticate via:Service AccountorService Account OAuth). WhenAuthenticate via:Service Accountis selected, the password string forms by gluing together your Salesforce account password and a security token generated for your Kinvey app by Salesforce (passwordSecurityToken). - Salesforce Client ID—The Salesforce Consumer Key generated when setting up an OAuth connected application on Selseforce (only when you have selected
Authenticate via:Service Account OAuth). - Salesforce Client Secret—The Salesforce Consumer Secret generated when setting up an OAuth connected application on Selseforce (only when you have selected
Authenticate via:Service Account OAuth).
- Host—Salesforce instance hostname, usually
Click Save to create the service environment and complete the service.
Creating Service Objects
To allow access to specific data in your system, you need to create a service object. A service object is a generic term for data objects or records on a remote system that Kinvey can interact with—in this case, a Salesforce SObject.
To create a service object, go to the Service Catalog, click your service, switch the service environment if needed, and select the Service Objects tab in the left-hand pane.
You can create service objects manually, but RapidData comes with a convenient auto-discovery tool you can use. Select the Discover option and then click the eponymous button to make Kinvey query all available service objects. From the results, select the service object that you want to expose and configure it.
The following example screen shows an SObject called "Contacts".
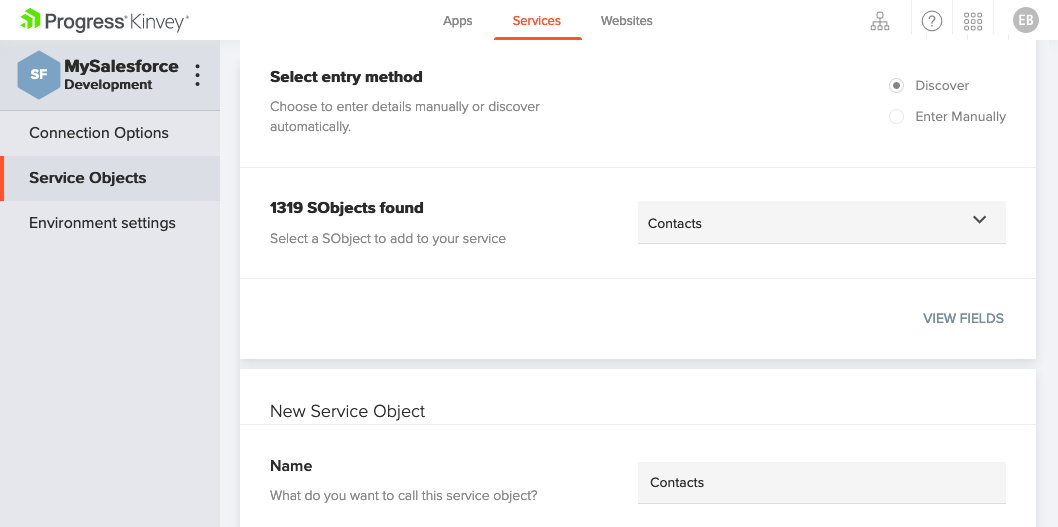
- In the Name text box, provide a name for the service object. This name is used by your mobile developer to reference the SObject within Kinvey. You can make the name match the SObject name, or provide a more user-friendly name.
Switching a toggle under Supported Operations enables the respective operation.
Any request sent to Kinvey for a operation not enabled here receives the
405 METHOD NOT ALLOWEDerror.If you want a read-only access to your system, only enable the
getoperations. EnablinggetByQuerymakes it possible for your mobile developers to submit queries using the Kinvey native mobile libraries.
Under Field Mapping, you can control the fields exposed.
Click ADD FIELD MAPPING to start defining mappings. You can click ADD ALL to create automatic mappings for all fields with the ability to remove the ones you don't need, or you can add field mappings one by one. Click REDISCOVER FIELDS if you don't see the ADD ALL button.
It is strongly recommended to map the source's primary key to the Kinvey_idfield. Specifying the primary key is required by Kinvey features like Offline and Caching (using the Cache and Sync data store types) and Cloud Caching.Nested fields are supported. To map a nested field, use a dot notation, e.g.
name.firstname. Note that if your system has nested fields, the discovery feature only detects the top level, but you can add the mapping manually. For example,location.citycan map toCityon the Kinvey side. There is no limit on the nesting depth.
Finally, click Save service object to create your service object and make it ready for accessing.
Accessing Service Objects
To make a service object accessible from a mobile application, you need to map it to a collection first.
Follow these steps to create a collection mapped to a service object:
- In the Kinvey Console, go to the app that will be consuming the service object and select an environment.
- From the menu on the left, select Collections > Add a Collection.
When entering a name for the collection, use the exact same name as the service object name.
The matched name serves as a mapping between the collection and the service object.
After the collection is created, go to Data Source in the collection menu and select Use a Data Service.
- Select the RapidData service and the service environment that you want to use.
- Select the Service Object that you want to map the collection to.
- Click CONFIRM.
You need to create and map a separate collection for each service object you exposed.
To verify that you can reach the data in the service object, make a request to the mapped Kinvey collection using the API Console (DATA > API Console in the left-hand navigation). Complete the URL box with the name of your collection and click Send to see a data panel below appear with your data in it. If updates or deletes are allowed, select the appropriate verb and pass the right request body if needed.
Connector for REST APIs
The RapidData connector for REST allows you to connect Kinvey to REST APIs. The configuration defaults used are organized around an assumption that the remote API is RESTful (e.g. it is not just JSON over HTTP). At the same time, given that this is not always the case, there are many options available to override the defaults.
Complete these steps to create a REST connector:
Go to Service Catalog > Add a service > RapidData and select REST.
Complete the form and then click Save.
- Name—Arbitrary name that will let you recognize the connector (for example, myRESTConnector). Note that duplicate names are allowed between connectors.
- Description—Optional description.
Scope/App—App or organization from your Kinvey account to use the service.
At this point, you will have a service created. The Console will start a new service environment for you, which is required for the service to be usable.
In the Connection Options tab of the service environment, set the following options:
- Host—Base URL that you are connecting to, for example
https://someApi.com/v1/api/). - Static Headers—Custom headers to be applied to all requests to this REST API. Suitable for API keys or special global static parameters that need to be passed.
- Query Params—Custom query-string parameters to be added to all requests to this REST API. Example:
?apikey=YzCwFdbh3cTuVGlvDCI9). - Authentication Type—Authentication mechanism to the REST API service.
- OAuth Client Credentials—Credentials are passed as a base64-encoded value in the
Authorizationheader. See the OAuth Options table for required data. - Mobile Identity Connect (MIC)—Indicates that you want to utilize a MIC setup that you created earlier. The options in the MIC Options table below allow you to choose how the authentication token is passed to the API.
- Basic—Credentials (username and password) are passed as a base64-encoded value in the
Authorizationheader. - None—Indicates that no authentication is required (common for APIs that just have a static API key).
- OAuth Client Credentials—Credentials are passed as a base64-encoded value in the
Login Options—Used for APIs that require login before making requests.
- Maintain Session—After logging in and retrieving a session token, stores that session token for future logins. See the Login Options table for option descriptions.
- Verify Only—Verifies the credentials before making a data request, but does not use or store a separate session token. See the Login Options table for option descriptions.
- No Login—Indicates that no login is required prior to making a data request. Note that this does not mean no authentication, just no separate login step.
Consult the tables below for option information.
- Host—Base URL that you are connecting to, for example
Click Save to create the service environment and complete the service.
Option information:
| MIC Options | Description |
|---|---|
| Credentials Map To Type | Pass via a Header, Query String or Body. |
| Credentials Map To Property | Name of the header, query string property, or body property (depending on your choice above) in which the authentication token will be stored. |
| Credentials Map To decode | By default, the token is base64 encoded. Use this option to decode it. |
| Basic Authentication Options | Description |
|---|---|
| Username | Username to be passed as base64-encoded string in the Authorization header. |
| Password | Password to be passed as base64-encoded string in the Authorization header. |
| OAuth Options | Description |
|---|---|
| Username | OAuth username. |
| Password | OAuth password. |
| Token Endpoint | URL to get OAuth token from. |
| Login Options | Description |
|---|---|
| Login Endpoint URI | Full authentication URI. |
| Login HTTP Method | HTTP method to use for authentication. |
| Token From Type | Source of session token: response header, query string, or response body. |
| Token From Property | Depending on the selected Token From Type, the name of the header, query string property, or body property from which the token will be retrieved. |
| Token To Type | Whether to pass the acquired session token in a header, a query string parameter, or the request body in subsequent requests. |
| Token To Property | Depending on the selected Token To Type, the name of the header, query string property, or request body property into which the session token will be placed. |
| Login Headers | Static values to pass to the authentication endpoint as request headers. |
| Login Query Params | Static values to pass to the authentication endpoint as query string parameters. |
| Login Bodies | Static values to pass to the authentication endpoint as request body parameters. |
Creating Service Objects
To allow access to specific data in your system, you need to create a service object. A service object is a generic term for data objects or records on a remote system that Kinvey can interact with—in this case, a REST endpoint.
To create a service object, go to the Service Catalog, click your service, switch the service environment if needed, and select the Service Objects tab in the left-hand pane.
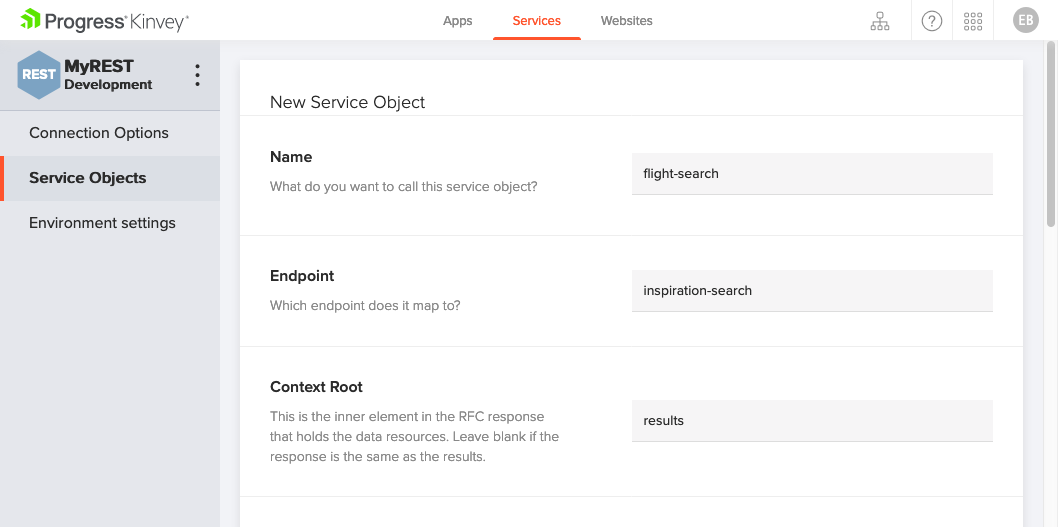
- In the Name text box, provide a name for the service object. This name is used by your mobile developer to reference the endpoint within Kinvey. You can make the name match the endpoint name, or provide a more user-friendly name. In the example above, the endpoint is "inspiration-search", but the service object name is "flight-search".
- In Endpoint, enter the URI part the identifies the specific resource.
Context Root optionally allows you to extract nested data from server responses.
If the JSON response from your server sends data as a nested property, set the Context Root to that property name. Leave blank if you need the entire response from your server returned to the client without modification.
In the example below, the
resultSetproperty contains the data that you want returned to the client, which requires setting Context Root toresultSet:{ someMetadata: '...', moreMetadata: '...', resultSet: [{<object1>},{<object2>},...{<objectN>}] }In Primary Key Type, select the type of the property that uniquely identifies the resource: Int (number), String, or Composite for composite primary keys.
- (Dependent on Primary Key Type) In Composite Primary Keys, specify the type and name of all fields that constitute the composite primary key.
- In Primary Key Name, enter the name of the property that uniquely identifies the resource.
- In Primary Key Mapping, select what part of the request maps to the primary key: Query Param, Body, Header, or Endpoint Token.
- In Query Mapping allows you to customize the way queries are passed from Kinvey to the remote REST API.
- Static Headers allows you to add any custom, static string values as a header to be included in every request to the API. Tokens are also supported.
- Query Parameters allows you to add any custom, static string values as a query string parameter to be included in every request to the API. Tokens are also supported.
Switching a toggle under Supported Operations enables the respective operation.
Any request sent to Kinvey for a operation not enabled here receives the
405 METHOD NOT ALLOWEDerror.If you want a read-only access to your system, only enable the
getoperations. EnablinggetByQuerymakes it possible for your mobile developers to submit queries using the Kinvey native mobile libraries.
Under Field Mapping, you can control the fields exposed.
Click ADD FIELD MAPPING to start defining mappings. You can click ADD ALL to create automatic mappings for all fields with the ability to remove the ones you don't need, or you can add field mappings one by one. Click REDISCOVER FIELDS if you don't see the ADD ALL button.
It is strongly recommended to map the source's primary key to the Kinvey_idfield. Specifying the primary key is required by Kinvey features like Offline and Caching (using the Cache and Sync data store types) and Cloud Caching.Nested fields are supported. To map a nested field, use a dot notation, e.g.
name.firstname. Note that if your system has nested fields, the discovery feature only detects the top level, but you can add the mapping manually. For example,location.citycan map toCityon the Kinvey side. There is no limit on the nesting depth.
Accessing Service Objects
To make a service object accessible from a mobile application, you need to map it to a collection first.
Follow these steps to create a collection mapped to a service object:
- In the Kinvey Console, go to the app that will be consuming the service object and select an environment.
- From the menu on the left, select Collections > Add a Collection.
When entering a name for the collection, use the exact same name as the service object name.
The matched name serves as a mapping between the collection and the service object.
After the collection is created, go to Data Source in the collection menu and select Use a Data Service.
- Select the RapidData service and the service environment that you want to use.
- Select the Service Object that you want to map the collection to.
- Click CONFIRM.
You need to create and map a separate collection for each service object you exposed.
To verify that you can reach the data in the service object, make a request to the mapped Kinvey collection using the API Console (DATA > API Console in the left-hand navigation). Complete the URL box with the name of your collection and click Send to see a data panel below appear with your data in it. If updates or deletes are allowed, select the appropriate verb and pass the right request body if needed.
Configuring REST endpoints
There are different ways that a REST connector can be configured and API calls can be made dynamic.
Passing parameters as part of the request
Header- HTTP headers allow the user to pass additional information with the request to the REST endpoint. You can set theQuery Mappingfield toHeaderto map kinvey parameters to header fields that the REST endpoint expects. For example, if you want to set a header to the REST endpoint calledsomeKeywith a value ofsomeValue, you can do it with the following call./appdata/:appKey/:collectionName/?query={"someKey":"someValue"}Body- You can set theQuery Mappingfield toBodyto map kinvey parameters to the request body. To pass information in thebodyto the REST endpoint, you can attach it to the query property of the KCS request./appdata/:appKey/:collectionName/?query={"someKey":"someValue"}This will send
{"someKey":"someValue"}in the body to the REST endpoint.Query String- You can set theQuery Mappingfield toqueryto map kinvey parameters to the request query params. To pass some information inquerystringto REST endpoint, you can attach it to the query property of the KCS request. The API request/appdata/:appKey/:collectionName/?query={"someKey":"someValue", "anotherKey":"anotherValue"}results in the following call to the REST endpoint:
myRestApi/myEndpoint/?someKey=someValue&anotherKey=anotherValue
Embedding dynamic tokens in the endpoint
Setting
Query MappingtoDynamic Endpoint TokenYou can use dynamic endpoint tokens to map the
query,skip,limit,fields, andsortproperties of thequeryobject to other parts of the URL.These endpoint tokens are structured as:querypropertyThe
queryproperty can be mapped using a token like<endpoint>/:queryToken{:key<assignment>:value;<delimiter>}For example, the configured endpoint can be
myEndpoint/:queryToken{:key=:value;,}The API request
/appdata/:appKey/:collectionName/?query={"key1": "value1", "key2":"value2"}results in the following call to the REST endpoint:
/myRestApi/myEndpoint/key1=value1,key2=value2skippropertyThe
skipproperty can be mapped using a token like<endpoint>/:skipTokenThe API request
/appdata/:appKey/collectionName/?skip=5results in the following call to the REST endpoint
myRestApi/myEndpoint/5limitpropertyThe
limitproperty can be mapped using a token like<endpoint>/:limitTokenThe API request
/appdata/:appKey/collectionName/?limit=10results in the following call to the REST endpoint
myRestApi/myEndpoint/10fieldspropertyThe
fieldsproperty can be mapped using a token like/<endpoint>/:fieldsToken{<delimiter>}For example, the endpoint can be configured as
myEndpoint/:fieldsToken{;}The API request
/appdata/<appid>/myRestCollection/?fields=['f1','f2,'f3']results in the following call to the REST endpoint
/myRestApi/myEndpoint/f1;f2;f3sortpropertyThe
sortproperty can be mapped using a token like<endpoint>/:sortToken{:key<assignment>;<asc>;<desc>;<delimiter>}
Setting
Query MappingtoTokensYou can map query properties to parts of the url at runtime using endpoint tokens. For example, you can define the endpoint such as
myEndpoint/:state/:cityThe API request
/appdata/:appKey/:collectionName/?query={“state”:”MA", “city”:”Boston”}results in the following call to the REST endpoint
/myRestApi/myEndpoint/MA/BostonUsing Kinvey Request tokens
- You can embed the username in the endpoint by defining the endpoint as
For example, if this username ismyEndpoint/:_kinveyRequest.userNameJohnDoe, this would result in the API callmyRestApi/myEndpoint/JohnDoe - Similarly, you can embed the user id in the endpoint configuration as
myRestApi/myEndpoint/:_kinveyRequest.userId - Also, you can embed the client app version that is present in the
X-Kinvey-Client-App-Versionheader bymyRestApi/myEndpoint/:_kinveyRequest.clientAppVersion Custom Request Properties
The object defined in the
X-Kinvey-Custom-Request-Propertiesheader can be used to create a dynamic endpoint as well. For example, if the endpoint is defined as:myEndpoint/:_kinveyRequest.customRequestProperties.someKeyand the
X-Kinvey-Custom-Request-Propertiesis set to{"someKey:"someValue"}, the resultant call to the following REST endpoint/myRestApi/myEndpoint/someValue
- You can embed the username in the endpoint by defining the endpoint as
Kinvey Request Tokens can be used for all types of API calls, but the others can be used only for query related calls (getByQuery, deleteByQuery, and getCountByQuery).