 Docs
Docs
A look behind the scenes of Kinvey's REST API
The purpose of this article is to offer insights into what happens in Kinvey behind the scenes and allow power users to get a deeper understanding about how the backend works.
A backend’s representation inside Kinvey
When an app is created, several things happen under the cover. The most important part is the creation of the default environment. Making a new environment begins by creating a special metadata object, which is used to store the entire configuration of your app - from the environment’s name to email templates to all the Business Logic code you eventually write. This object is stored in our metadata store and is accessible indirectly via the Management Console.
Second, we create a data store in one of our MongoDB clusters. This data store holds the data you and your end users create. As the data grows, our background processes create indexes over it for more efficient access. Lastly, we provision a file storage bucket in Google Cloud Storage.
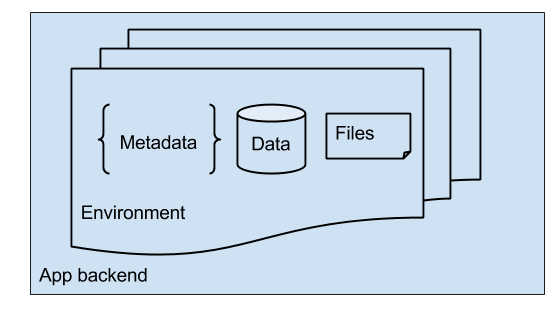
Both the data store and the file bucket are secured and only accessible via the respective API and the right ACL settings.
This representation makes tasks like environments cloning relatively straightforward - all that is done is to copy the metadata, data and indexes, and files, over to a new environment.
The processing flow of a Kinvey request
When calls are made to Kinvey from a one of the client libraries, behind the scenes it results in calls to the REST API. At a high level, the main function of the REST API is to accept requests and process them based on metadata configured by the developer, global metadata, and features baked into the platform. The rest of the article explains the key pieces in this processing pipeline.

On each instance the service is fronted by a lightweight nginx proxy which performs the first step - rate limit checks. Rate limits are there to mitigate DDoS attacks as well as prevent inadvertent overloading caused by a programming mistake in a single app.
One the check passes, the request is forwarded to the main application server. The first thing we do there is generate a request id. The request id is passed to all downstream components and/or external components and is used to track and help debug distributed issues.
Next, we handle CORS preflight requests. These are requests that the browser fires on behalf of browser based apps. All we do here is respond back by setting appropriate headers to inform the browser whether to proceed making the actual request.
After the request body is fully deserialized, the first thing we do is determine the environment this request is for, and load all the necessary metadata in the Load Metadata step. Loading the entire metadata object avoids any multiple round trips further down the processing flow.
Once the metadata is loaded, we need to immediately authenticate the user making the request. On the diagram this is labeled as AuthN and is performed by looking at the Authorization header and based on the scheme used extract the embedded user/password or a session token.
After authentication follows authorization (AuthZ). Here we apply ACL settings gathered from several different places - the collection-level settings, the entity level ACLs as well as some implicit baked-in ones, such as the limited access of the app secret, etc. Here some more round trips to the database may be required - for example, if the entity has an ACL that contains a group, we need to check the group membership.
Next step is the Business Logic pre-hook. This is the first phase where developers get the opportunity to execute custom code. We check to see if a pre hook is defined for this {collection, verb} combination. For example, if this is a POST to /books, we will look in metadata for an onPreSave definition in the books collection metadata.
If a pre hook definition is found, we send the code and the relevant metadata to a separate Kinvey component, whose only purpose is to execute Business Logic code. Executing code supplied by a user in a safe manner is a difficult task. We take a great effort in ensuring that the code sandbox is properly restrictive, while still offering enough APIs for as many use cases as possible.
Once the code is executed, we “merge” the results back into the processing pipeline. The merging essentially overwrites the original HTTP request (body, headers, status code) with the ones set inside the BL code. A special action is taken if response.complete() is called - processing jumps forward to the last execution step (complete request). A similar jump is performed if a runtime or a timeout error is thrown.
If the pre-hook finished successfully with a response.continue(), we go to the Set entity metadata step. Here we set values such as _kmd.lmt (last modified time), _kmd.ect (entity creation time) and _acl.creator, as appropriate for write create (POST) and update (PUT) operations.
We finally arrive at Data API call - the step where the actual data access being performed. At this point auth is cleared, pre-hook has passed and we are ready to perform the operation - create, read, update or delete.
If the operation was a read (fetch by id or a general query), then Resolve references is performed. If the resolve query parameter is set (directly, or indirectly by a client library), we do the necessary additional Data API lookups to fetch the related entities. This is done efficiently with as few round trips as possible. At the same time, since it does involve multiple calls it contributes to resolve requests being more restricted than plain ones.
After the data (or data link) operation is performed, we reach the second custom code phase - Business Logic post-hook. The exact same high level logic applies as in ‘pre-hook’. The main difference here is that response.body already contains the result of the Data API operation.
After post-hook, there is nothing more to do, but format the response, serialize it into a HTTP body and send it out.
The flow for Custom Endpoints is the same up to AuthZ and very simple afterwards:

Below is the File API flow:

Other methods (login, reset password) have more specific flows and may be detailed in a subsequent article.
We hope you find this article useful! Let us know on the Forum if you’d like us to provide more details in a particular area.